This manual applies to version 4.19 of the PIPT. It is a work in progress and will be extended to cover phase 2 in more detail.
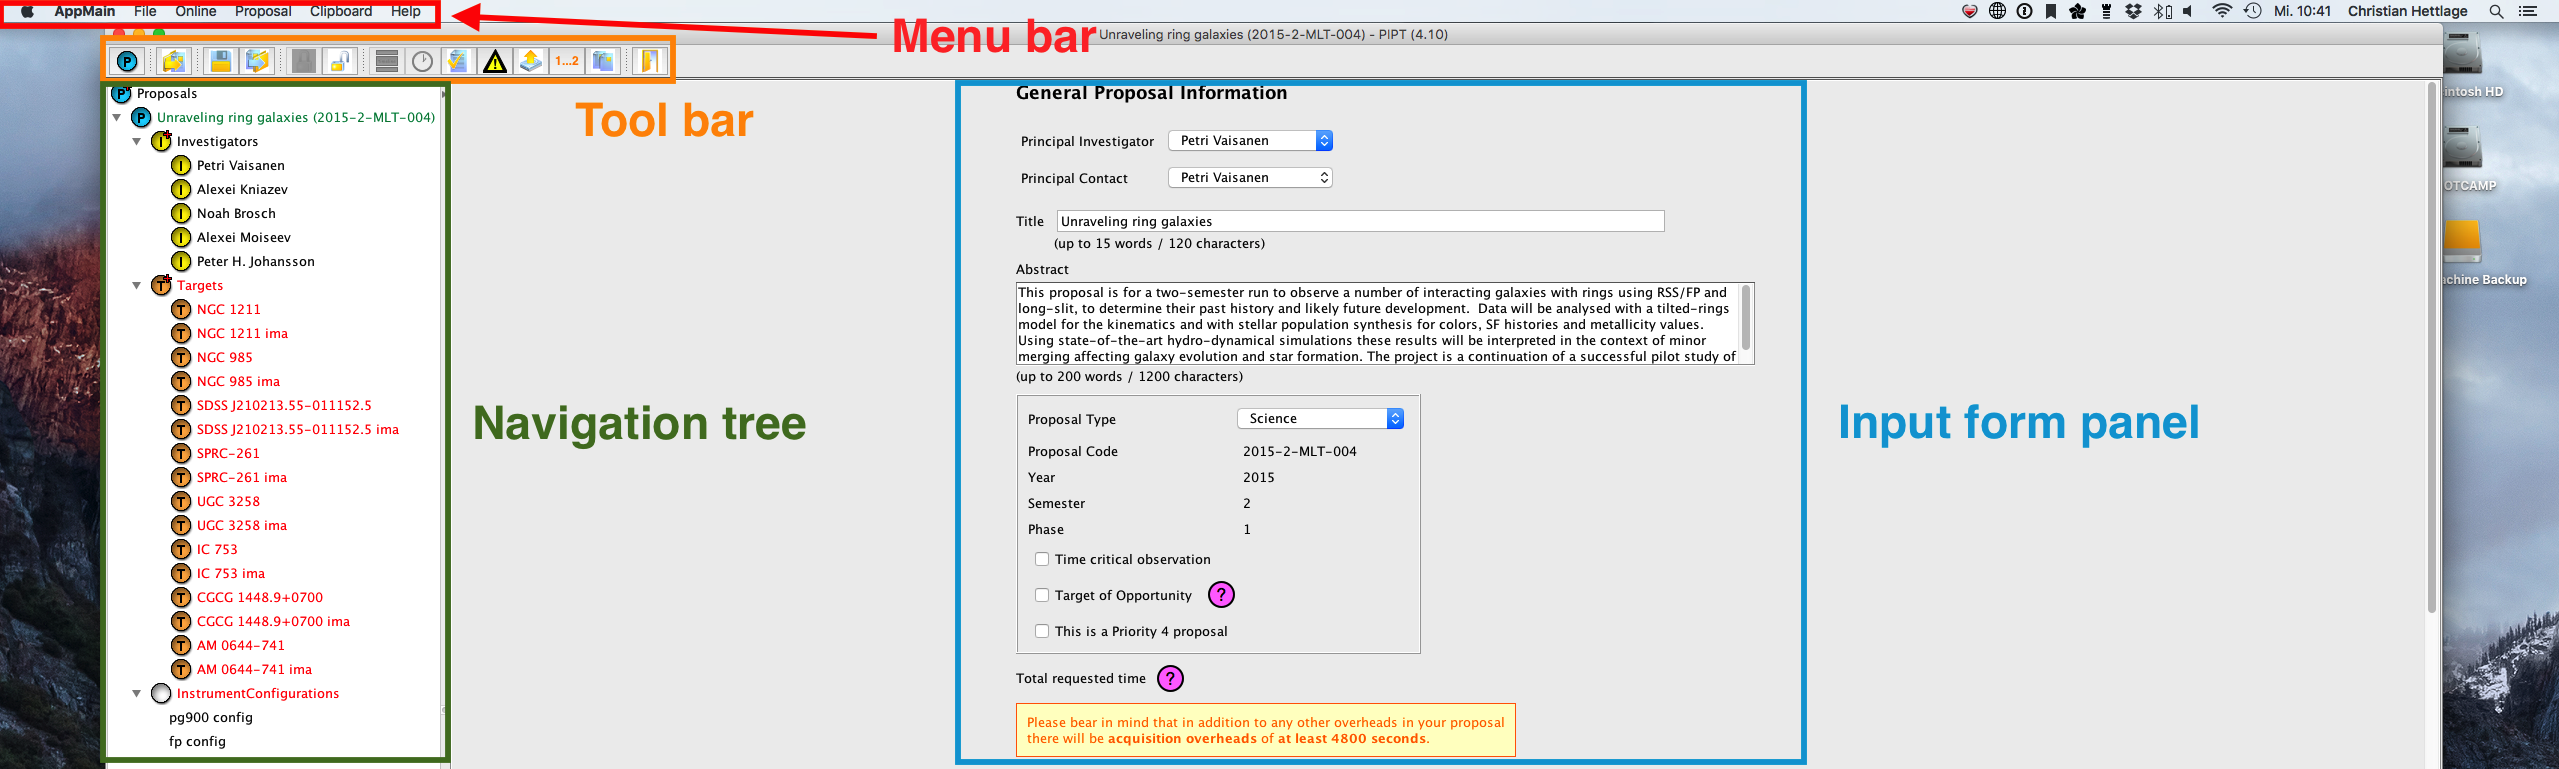
The PIPT has four main components.
These are indicated in the image below.
The navigation tree lets you view and update the structure of all your proposals. As you would expect, you can collapse or expand subtrees by clicking on the little triangle next to the label icon. But if you have to expand (or collapse) a subtree with lots of descendants it is much more convenient to right-click on the subtree's root node and choose Expand subtree or Collapse subree from the context menu.
As you may have guessed, the label icons symbolise the kind of content represented by the tree node. If you click on a node, you get to the form for editing this content. The label text is either generic (such as Investigators or Targets) or is based on a name you've chosen.
The proposal nodes in the tree can be sorted by proposal code or by proposal title, either in ascending or descending order. This sorting criterion can be chosen on the Sort Proposals tab of the preferences panel.
You can edit the navigation tree by right-clicking on any of its nodes and choosing an action from the context menu. The following table lists the various options. Not all of these are available for all nodes, though.
| Option | Explanation |
|---|---|
| Add | Add a new element as the last child. |
| Insert before | Insert a new element before this element |
| Insert after | Insert a new element after this element |
| Add ... to clipboard | Add the element(s) to the clipboard for later use |
| Show clipboard | Show the clipboard content |
| Clear clipboard | Remove all content from the clipboard |
| Expand subtree | Fully expand this node and all its descendants |
| Collapse subtree | Collapse this node |
There are various ways of adding an element:
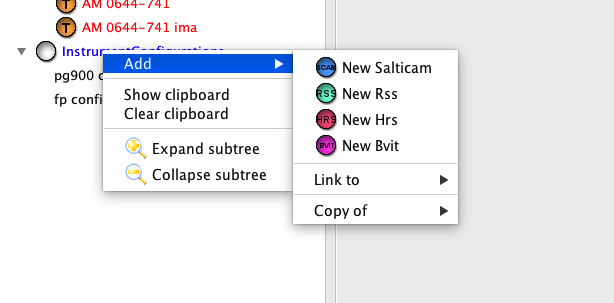
If you copy an element, you create a completely new element, which has the same content as the copied element, but otherwise is independent. Changes in the copied element won't affect the original element (and vice versa).
On the other hand, if you link to another element, no copy is created; you use the existing element. So any changes you make will affect all instances where the element is used.
Note that element copies are deep. In other words, all descendants of the original element are copied (rather than linked to).
The tool bar contains shortcuts to various items from the menu bar.
| Icon | Menu bar item |
|---|---|
 | File > New Proposal |
 | File > Import from Zip File |
 | File > Save |
 | File > Export as Zip File |
 | Online > Login |
 | Online > Logout |
 | Proposal > Show Timeline |
 | Proposal > Show Observing Times |
 | Proposal > Show Warnings |
 | Online > Submit |
 | Online > Convert to Phase 2 |
 | Proposal > Clone |
 | PiptManager > Quit PiptManager or File > Quit |
As you'd expect, there is a menu bar either at the top of the PIPT window (for Windows or Linux) or at the top of the screen (for Mac OS). The menu items are the same for all operating systems, but some of their locations differ.
| Menu item for Mac OS | Menu item for Windows/Linux |
|---|---|
| PiptManager > About PiptManager | Help > About the PIPT |
| PiptManager > Preferences | Edit > Preferences |
| PiptManager > Quit PiptManager | File > Quit |
Here is an overview of all the available menu items.
Shows a dialog with the application name (as if you didn't know you are using the PIPT), the version number (which you can also find in the window title) and the email address for support (salthelp@salt.ac.za).
Opens a window for setting preferences, which has various tabs.

By default the PIPT asks for confirmation before it quits. In addition, it points out any unsaved files. You may disable these notifications on the warnings tab.
Lets you set the color for the navigation tree labels, depending on whether they are selected (i.e. their content currently is shown in the form panel), whether you have right-clicked on them (to see the context menu), or whether they are incomplete.
The colour for incomplete tree nodes should be taken with a grain of salt; nodes may be shown as incomplete even though they aren't.
In case you are accessing the internet via a proxy, you need to supplied the proxy's URL. Tick the respective checkbox if your proxy requires authentication.
If you are in doubt about whether you are using a proxy, you should ask your local IT guru.
Lets you choose the directory where to store all the proposals and related PIPT files. The change will only take place the next time you launch the PIPT.
The PIPT won't move any files on your disk, so it is up to you to move all the existing content. The easiest might be to just rename the existing (old) directory. On a Mac or Linux you can use a command like
mv /path/to/old/pipt-dir /path/to/new/pipt-dir
Lets you choose how the proposal node should be sorted in the navigation tree, and how the proposal should be displayed.
The options for sorting are to sort by proposal code or by proposal title, and in both cases you may choose to use ascending or descending order.
The options for the proposal name are to use the proposal title followed by the proposal code in parentheses (such as "My Shiny Proposal (2016-2-SCI-078)"), or to use the proposal code followed by the proposal title in parentheses (such as "2016-2-SCI-078 (My Shiny Proposal)", or to just use the proposal code (such as "2016-2-SCI-079").
Changing these preferences collapses any currently expanded tree nodes.
Quits the PIPT. No files are saved. You may choose in the preferences whether you want to be warned about quitting and/or about unsaved files.
Creates a new proposal. There are four different proposals types.
In the majority of cases you should opt for a Science proposal. You may find more details about Large Science and DDT proposals in the call for proposals.
There are templates for the scientific justification of Science and Large Science proposals, which can be downloaded from http://astronomers.salt.ac.za/proposals/proposal-templates/. Please use the correct template, as otherwise your scientific justification might not be accepted.
Imports a proposal from a zip file, as created by the menu item File > Export as Zip File. If the proposal exists already you can choose whether to replace the existing proposal or create a new one.
In most cases you should opt for replacing the existing content, as a newly created proposal will have no proposal code.
Saves the currently edited proposal. Note that unfortunately there is no autosave functionality, so that saving regularly might be a good idea.
Exports the proposal content to PDF. The same PDF will be generated for the Time Allocation Committee when you submit the proposal.
Exports the proposal as a zip file. This is particularly useful if you get stuck and need to send your proposal to salthelp@salt.ac.za.
Exports the details of all the targets in the currently selected proposal to a csv file.
Logs you in to the SALT server. You usually don't have to use this menu item, as the PIPT will prompt you for your username and password when required.
Logs you out from the SALT server.
The PIPT uses some technical information (such as exposure times for RSS arcs) which are stored in SALT's science database. Whenever this information is updated in the database, the PIPT will ask you to use this menu item to keep the PIPT up-to-date.
Allows you to select another server to use for the PIPT. This is solely for testing, and you can safely ignore this menu item.
Converts the currently selected phase 1 proposal into phase 2. The existing phase 1 content will be replaced. Converting the proposal is possible only if it has been accepted and time has been allocated to it.
Imports a proposal from the server. You may choose whether to import a phase 1 or phase 2 proposal. If the imported proposal exists in the PIPT already, you may choose whether to replace the existing content or create a new proposal.
In most cases you should opt for replacing the existing content, as a newly created proposal will have no proposal code.
Submits the currently selected proposal to the server.
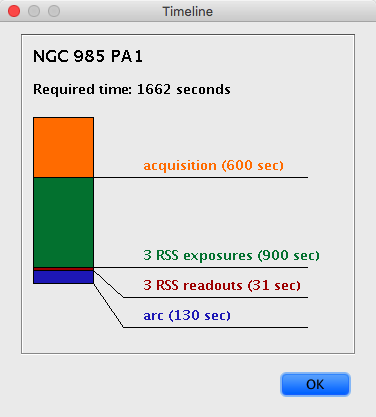
Shows the timeline for the currently selected element, i.e. the sequence of steps and the times required for them. An example is shown below.
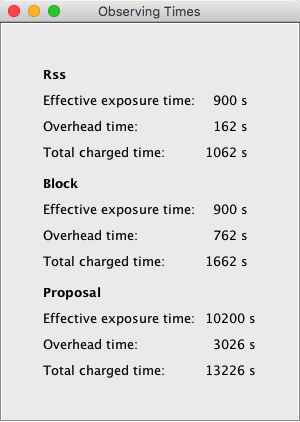
Opens a window displaying the observing times for the currently selected element, its block and the proposal. The times are updated whenever you make a change or select another element.
Validates the currently selected proposal. If the proposal is valid, its XML is shown.
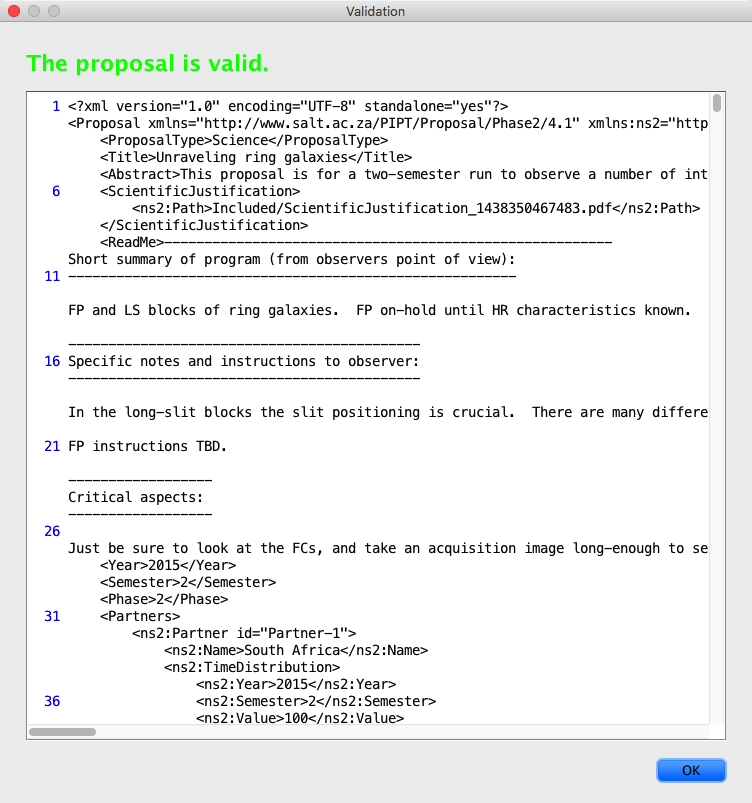
If it is invalid, a list of errors is shown as well.

The error messages can be a bit cryptic. However, if you have a look at the line in the XML where the error was found you might find a clue as to where the issue might be.
You might find that the error is in an element which appears nowhere in the proposal. This may happen as the PIPT unfortunately sometimes fails to remove all elements it should remove. So if you are completely dumbstruck by an error, you might try whether the menu item Proposal > Clean resolves the problem.
And if the source of the error completely eludes you, export the proposal as a zip file and send it to salthelp@salt.ac.za.
Shows all the warnings for the currently selected proposal. You should pay close attention to these, as some of these may be actual errors (which will prevent proposal submission) or may imply that you are requesting a setup which doesn't necessarily make sense.
Opens a window which list the number of nights when the blocks in the currently selected proposal can be observed. It may take a few moments for the window to appear.
Updates the details regarding already executed observations for the currently selected proposal. Use this menu item to ensure that the observing and available times in the proposal are up-to-date.
Creates a new proposal with the same content as the currently selected one.
When you create a new proposal, a semester (such as 2015-2 or 2016-1) is assigned to it. (In case of a DDT or commissioning proposal you actually select it.) While in most cases the semester should be the one you intended, you may use this menu item to change it if need be. Make sure the semester is correct, as otherwise your proposal won't be observed.
Sometimes elements aren't properly removed by the PIPT, and while these zombie elements aren't shown in the navigation tree, they may cause errors. This menu item removes all such elements.
When you try to submit a proposal with zombie elements, you should get an error message asking you to apply this menu item.
In rare cases you might need a slit mask or filter which is only offered for other modes or for commissioning proposals. If you have good reason to request any of these in your setup (and know what you are doing), you can use this menu item to enable such non-standard setups.
If non-standard setups are enabled, the form for Phase 2 RSS configurations will include a checkbox for showing non-standard masks and filters.
Please consult with your liaison SALT Astronomer before using non-standard setups.
In rare cases your proposal may require a more complicated structure than what the PIPT allows by default. If so, you can use this menu item to explicitly show elements which usually are hidden. The rule of thumb for using this feature is Don't. Or at least Don't without asking salthelp@salt.ac.za first.
Shows the content of the clipboard. The clipboard may contain blocks, instrument setups and targets, and you can use it to copy items across proposals. You shouldn't use it for copying elements within the same proposal.
Removes all content from the clipboard.
Opens the PIPT web page in your default browser.
Some of the menu items have keyboard shortcuts. These are shown in the menu.
Whenever you select an element, the input form panel shows the corresponding form for defining the element content. The forms are discussed in detail in later sections.
This section walks you through the whole proposal process from installing the PIPT to receiving the data. It won't touch on the details of the various forms (which will be covered in later sections) but is intended to give you a general idea of how to use the PIPT.
Before downloading the PIPT, you should make sure that two prerequisites are fulfilled.
First, Java 8 must be installed on your computer.
Java is a platform independent language which is available for Windows, Mac OS and Linux alike. You can download it from Oracle's Java download page. It doesn't matter whether you download the Java SDK for developers or just the runtime environment for end-users.
Unfortunately, earlier versions of Java are no longer supported. You might have to upgrade your operating system to run Java 8, at least if you haven't updated it in the last years. Mac OS users should take note that Java isn't included out of the box any more.
Linux users might be tempted to use their package manager to install Java. However, more likely than not this will install the Open JDK rather than Oracle's Java. And while this might change in future, the OpenJDK at the moment isn't supported by the PIPT, as it cannot handle JPEG images.
Second, you must have a SALT account. You can get this by registering at https://www.salt.ac.za/wm/index.php?tab=Register. You'll have to choose a username and password, provide your name and contact details, and select the partner and institute you are affiliated with.
If you are affiliated to a SALT partner and cannot find your institute on the registration form, you should contact salthelp@salt.ac.za. If you aren't affiliated to a SALT partner, you must select the partner Other. In this case you may add your institute (if it's not in the list already) by choosing the item ADD NEW INSTITUTE from the list of institutes.

Once you have registered you will receive an email with a confirmation link. It is of utmost importance that you use this link to validate your email address, as otherwise you won't be able to submit proposals later on.
You may download the PIPT from http://astronomers.salt.ac.za/software/. The PIPT is supplied as a Windows exe file, a Mac OS dmg file and as a generic jar file.
Just move the downloaded exe file wherever you deem fit. You can launch the PIPT by double-clicking the file icon, as you would for any other application.
Double-click the downloaded dmg file, and in the window that opens move the PIPT file into the Applications folder. (You may instead move the file to another convenient location.) You can launch the PIPT by double-clicking the file icon, as you would for any other application.
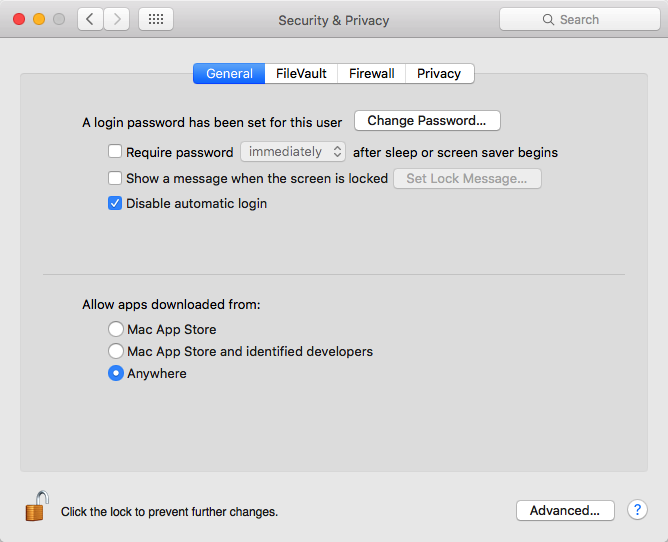
You may get an error message informing you that the dmg file is corrupted. This is caused by security restrictions. Open the Security & Privacy pane in the system preferences and make sure that the option Anywhere is chosen for Allow applications downloaded from, as shown below.
Move the jar file to a convenient location. Depending on your system setup you might be able to launch the PIPT by double-clicking the jar file icon. Otherwise you can start it by running the following command in a terminal (assuming you are in the directory of the jar file).
java -jar PIPT.jar
When you launch the PIPT for the first, you are greeted by a welcome window.
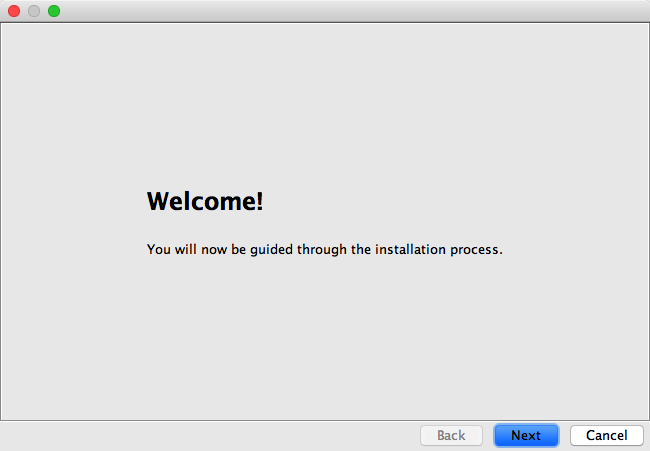
Once you feel sufficiently welcome, click on the Next button. You are then confronted with the harsh reality of having to make a decision: Do you want to download the database data the PIPT requires?
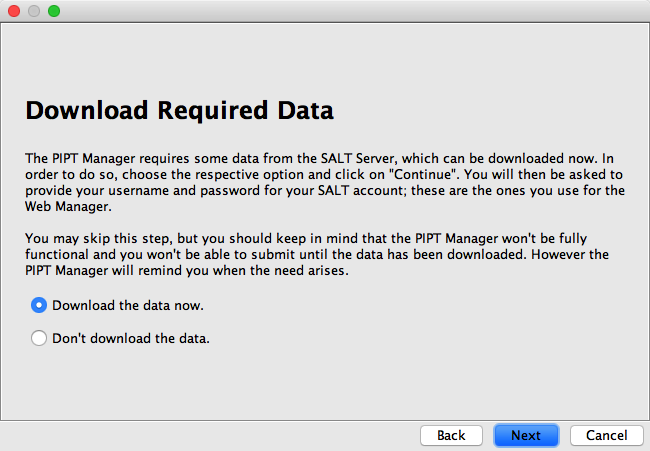
Unless you are reading this in a plane 30,000 feet above ground, you are strongly encouraged to select the Download the data now option. You will then be asked to authenticate yourself.
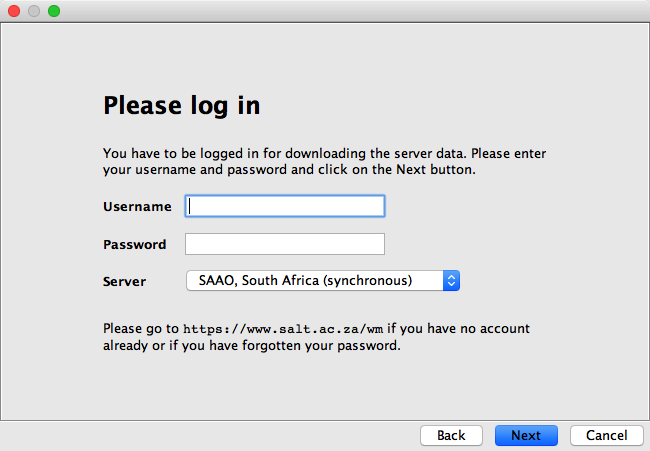
The username and password are those you chose when setting up your SALT account. If you've forgotten these, you can request a password reset on https://www.salt.ac.za/wm/PasswordReminder/.
You can ignore the server dropdown menu, not least because it only offers one choice.
After logging in you are presented with a summary.
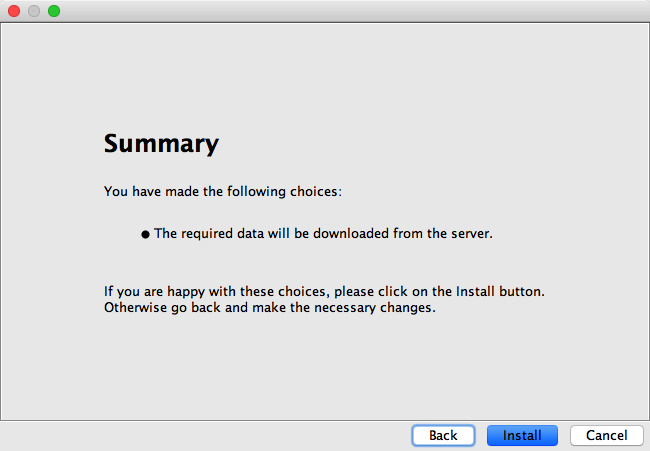
If you are happy with the summary, click on the Install button. The PIPT downloads the database data (in case you've chosen that option) and informs you once all is installed.
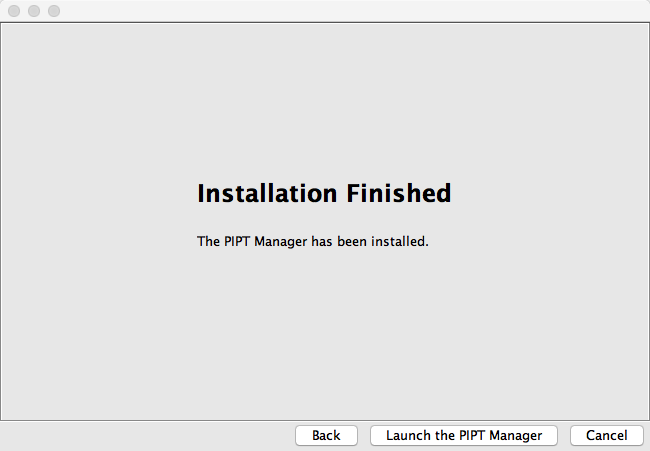
Now the wonders of the PIPT are only a click (on the Launch the PIPT Manager button) away!
When the PIPT opens, you are confronted with a clean slate with no sign of any proposal.
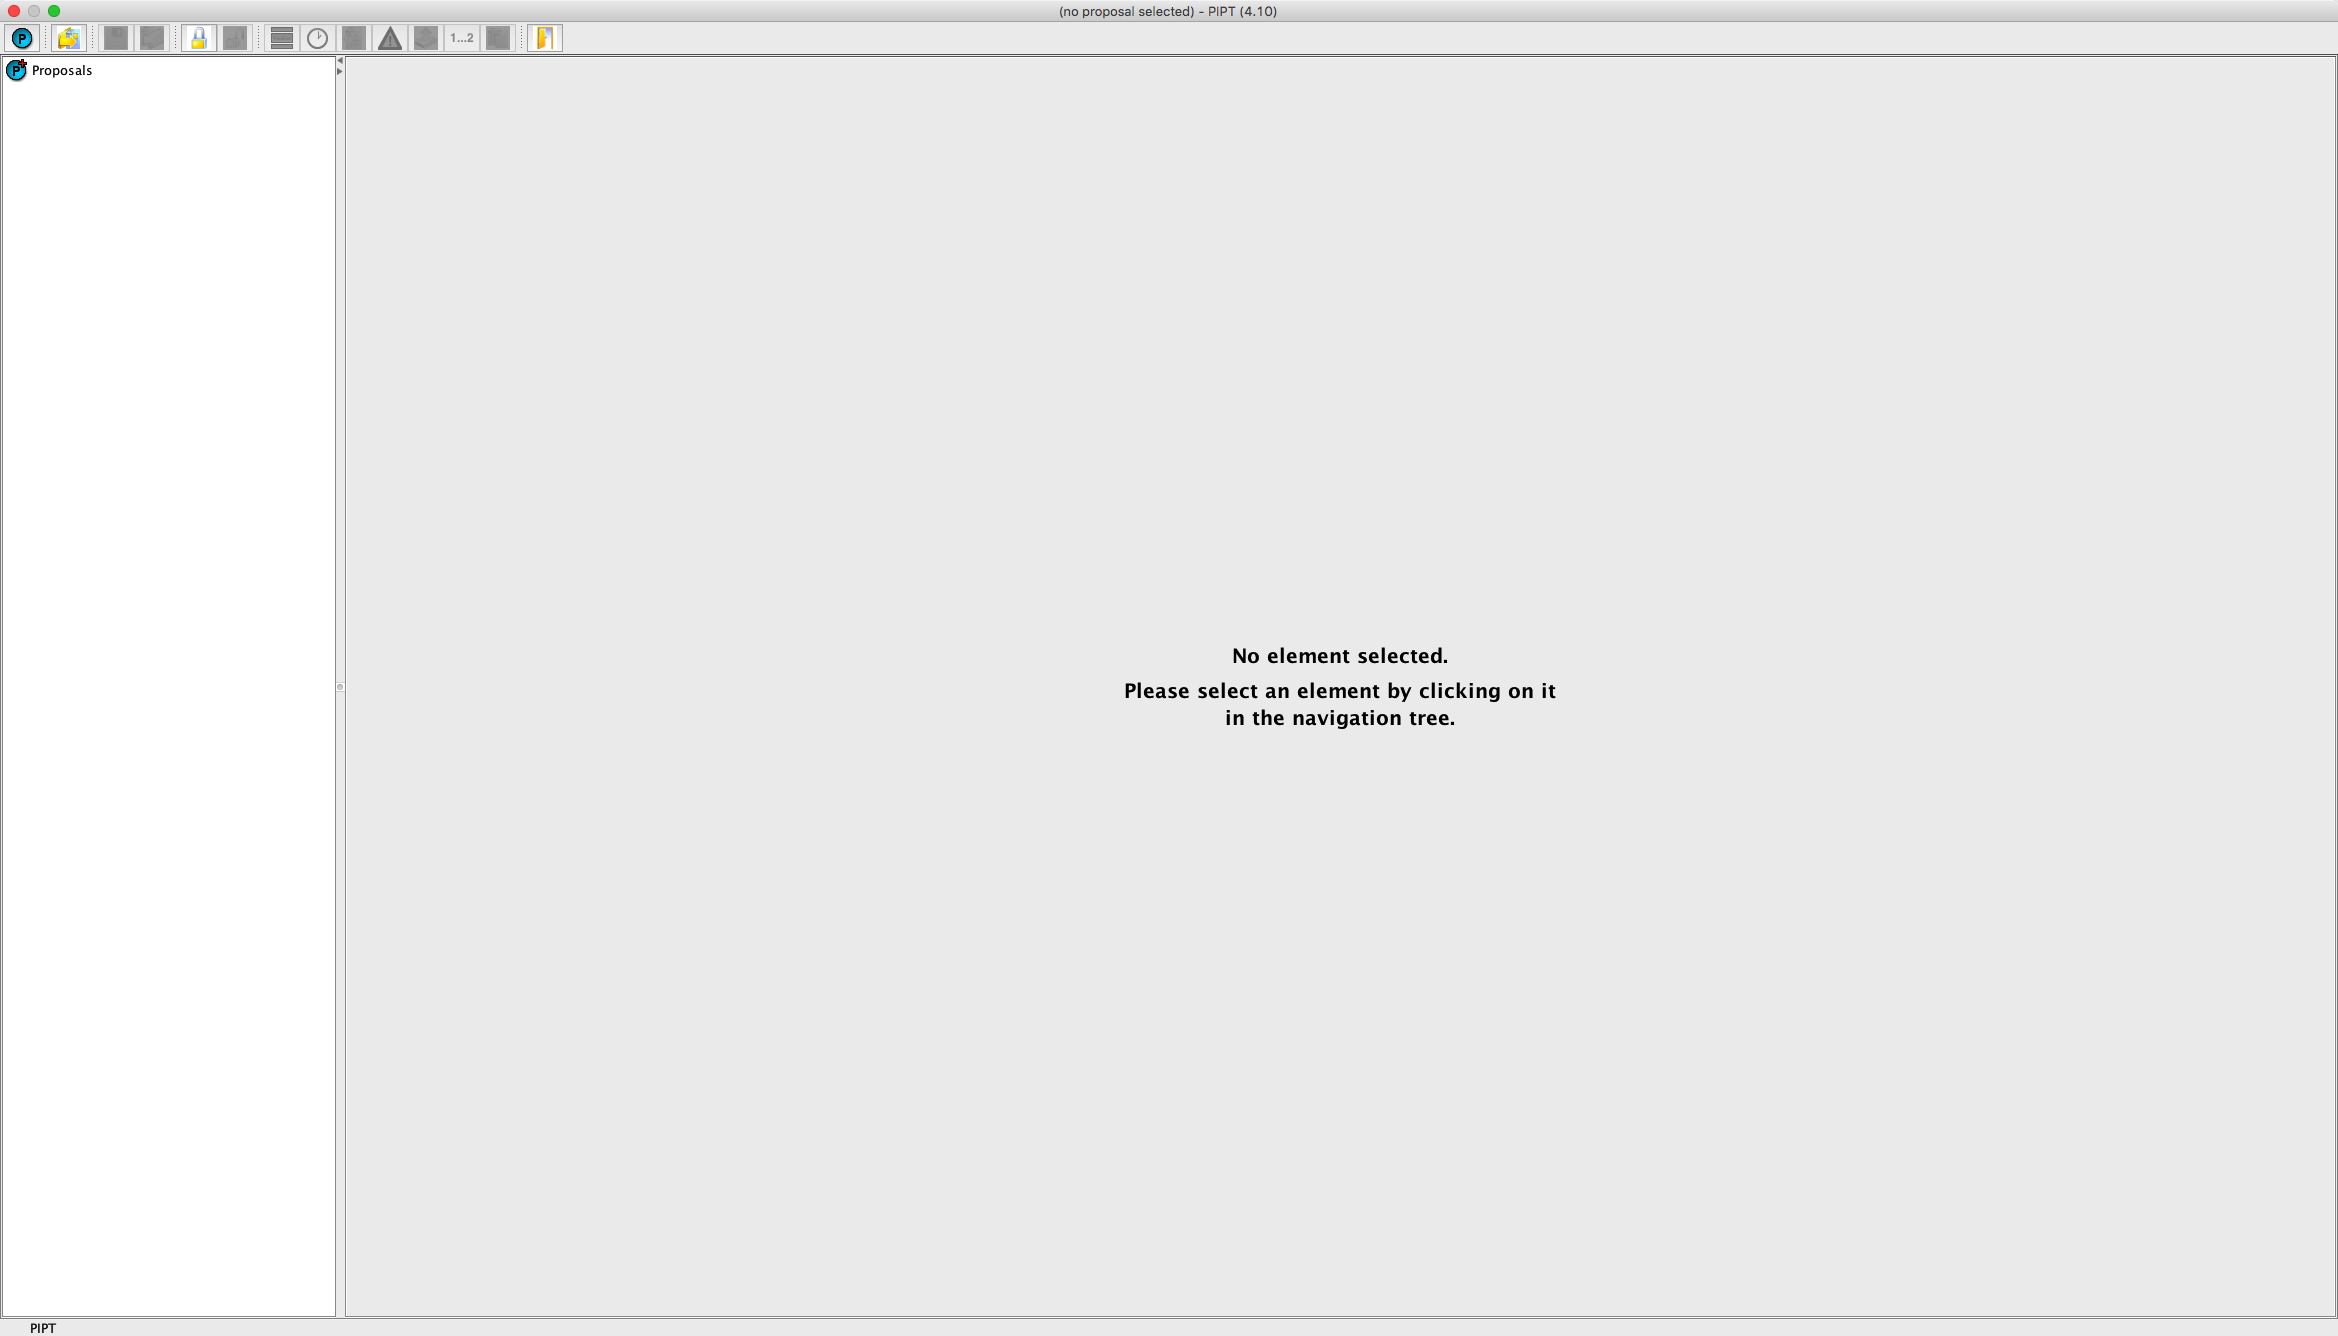
On the left of the screen there is the navigation tree, which currently consists of a single Proposals node. On the right there is the form pane, which shows no form as nothing has been selected so far. Above these two there is a toolbar, and at the top of the window or, for Mac OS, the screen you can find the menu bar.
As the form panel instructs us to select an element, we might as well do. Click on the Proposals link in the navigation tree. The node changes its colour to a dark green (indicating it is selected), and the form panel displays an (empty) table of proposals.
When this manual mentions a click, it always refers to a click with the left mouse button, unless it specifically mentions a right-click. If you are a hard core Mac user, you might object to right clicks on the grounds that mice only have one button. Feel free to replace all mentions of a right click with something like "click the mouse with the ctrl key held down".
Right-click on the table and select New Proposal from the context menu. Choose the default option (Science) when prompted for the proposal type, and opt to create the proposal from scratch when asked in the next dialog. Voila, a new proposal appears in the navigation tree, and a form for general proposal information is shown in the form pane.
There are actually three other ways to create a new proposal:
Go ahead and try these out. If you do this, you will face the next question: How do I get rid of all the surplus proposals now? There are two ways to achieve this goal:
You will have noticed the general pattern in the above: If you have to create or delete elements, the right mouse button is your friend.
If you've read the preceding section carefully, you might have stumbled over the word element. Element? What element?
All the proposal content (save attachments like finding charts) are stored as XML by the PIPT. So in principle a proposal looks like the following:
<Proposal>
  <Investigators>
    <Investigator>...</Investigator>
    <Investigator>...</Investigator>
  </Investigators>
  <Targets>
    <Target>...</Target>
    <Target>...</Target>
  </Targets>
  ...
</Proposal>
The XML defines a tree structure, and the tree nodes are called elements. So in the example above the Proposal element contains a Targets and an Investigators child element, which in turn contain Target and Investigator elements.
Each tree node in the PIPT's navigation tree (apart from the Proposals node) can be mapped to an XML element, which is why the word element is used in this manual.
Let us have a quick look at the structure of a phase 1 proposal before moving on:
Proposal
  Investigators
    Investigator 1
    Investigator 2
    ...
  Targets
    Target 1
    Target 2
    ...
  Instrument Configurations
    Instrument Configuration 1
    Instrument Configuration 2
  ...
The Proposal, Investigators, Targets and InstrumentConfigurations elements are all generated automatically when you a create a proposal, but it remains up to you to fill this structure with life.
So you have to add various elements, and if you remember how you added a new proposal, it shouldn't come as a surprise that there are several ways of doing this.
And if you need to delete an element, you have two options.
You might note that for targets the context menu offers to add a target from the clipboard. You may ignore this for now.
Now that you know how to create new elements, you only have to fill in their forms... We will discuss the forms in detail in a later section, but there are a few general aspects you should keep in mind while working on your proposal.
If you want to base your proposal on an existing proposal from a previous semester, the easiest might be to use the menu item Online > Import from Server to import that proposal. In case the proposal exists in the PIPT already, you will be asked whether you want to replace the existing version. Choose not to replace it.
If the imported proposal has a real proposal code (i.e. not a code of the form Unsubmitted-...), you have to use the menu item Proposal > Clone to create a new proposal with the same content.
Chances are that the semester of the imported or cloned proposal isn't correct, and if so you'll have to use the menu item Proposal > Change Semester to select the correct one.
Afterwards you can make all the necessary changes. In particular, you should remember to replace the scientific justification and to update the details for the proposals from the last four semesters. Both can be done on the general information form.
While adding a hundred targets in the PIPT may perhaps count as a form of meditation or be used as a form of self-punishment, luckily there is no need for it.
Instead you may include all the target details in a comma-separated values (csv) file and import it on the Targets form. A simple way to figure out what this csv file must look like is to add a target with all required details, and then to use the menu item File > Export Target Data to export it.
The following table lists all the columns available for the csv file.
| Column name | Required? | Default value | Notes |
|---|---|---|---|
| target name | Yes | must be unique | |
| target type | Yes | see below for the list of available types | |
| right ascension | Yes | a float | |
| declination | Yes | a float | |
| equinox | Yes | 2000 | a float value |
| bandpass | Yes | bandpass for the magnitudes; must be U, B, V, R or I | |
| minimum magnitude | Yes | ||
| maximum magnitude | Yes | ||
| observing time | For Phase 1 | observing time per visit, including overheads; ignored for Phase 2 proposals | |
| maximum lunar phase | For Phase 1 | in percent; ignored for Phase 2 proposals | |
| epoch | No | 1 January 2000, 12:00:00 UT | string of the form yyyy-mm-ddThh:mm:ss.s |
| proper motion ra | No | 0 | in arcsec/year |
| proper motion dec | No | 0 | in arcsec/year |
| visits | No | 1 | number of visits for this target; ignored for Phase 2 proposals |
| ranking | No | High | ranking relative to other targets; must be High, Medium or Low; ignored for Phase 2 |
| ephemeris time base | No | must be BJD, HJD or JD; UTC is assumed as time standard | |
| ephemeris T0 | No | must be given in the chosen ephemeris time base | |
| ephemeris period | No | in days | |
| ephemeris period change | No | 0 | rate of change in the period, in days/day |
A simple example would be
target name, target type, right ascension, declination, equinox, bandpass, minimum magnitude, maximum magnitude, visits, observing time, maximum lunar phase, ranking
QPO 6754, EllipticalG, 120.534, -0.317, 2000, R, 18.3, 18.3, 1, 1200, 50, High
BX 45, Irregular_V*, 195.194, 0.981, 2000, B, 16.6, 19.0, 3, 940, 15, Low
The following table lists the available target types. The bullets in the first column are only included to give an idea of how the types are related, and they mustn't be included in the csv file. So for example, use WD* for a white dwarf or Compact_Gr_G for a compact group of galaxies.
| Target type | Explanation |
|---|---|
| Unknown | |
| Unknown | object of unknown nature |
| Radio sources | |
| Radio | radio-source |
| · Maser | maser |
| X-ray sources | |
| X | X-ray source |
| · SuperSoft | supersoft source |
| Gamma-ray sources | |
| gamma | gamma-ray source |
| · gammaBurst | gamma-ray burst |
| Inexistant | |
| Inexistant | inexistent objects |
| · Error | not an object (artefact) |
| Gravitation | |
| Gravitation | gravitational source |
| · LensingEv | (micro)lensing event |
| · Candidate_Lens | possible gravitational lens |
| · Possible_lensImage | possible gravitationally lensed image |
| · GravLens | gravitational lens |
| · GravLensSystem | gravitational lens system (lens+images) |
| Candidates | |
| Candidates | candidate objects |
| · Possible_SClG | possible supercluster of galaxies |
| · Possible_ClG | possible cluster of galaxies |
| · Possible_GrG | possible Group of galaxies |
| · Candidate_** | physical binary candidate |
| · · Candidate_EB* | eclipsing binary candidate |
| · · Candidate_CV* | cataclysmic binary candidate |
| · · Candidate_XB* | X-ray binary candidate |
| · · · Candidate_LMXB | low-mass X-ray binary candidate |
| · · · Candidate_HMXB | high-mass X-ray binary candidate |
| · Candidate_Pec* | possible peculiar star |
| · · Candidate_YSO | young stellar object candidate |
| · · Candidate_pMS* | pre-main sequence star candidate |
| · · · Candidate_TTau* | T Tau star candidate |
| · · Candidate_C* | possible carbon Star |
| · · Candidate_S* | possible S Star |
| · · Candidate_OH | possible star with envelope of OH/IR type |
| · · Candidate_CH | possible star with envelope of CH type |
| · · Candidate_WR* | possible Wolf-Rayet star |
| · · Candidate_Be* | possible Be star |
| · · Candidate_HB* | possible horizontal branch star |
| · · Candidate_RGB* | possible red giant Branch star |
| · · Candidate_RSG* | possible red supergiant star |
| · · Candidate_AGB* | possible asymptotic giant branch star |
| · · Candidate_post-AGB* | post-AGB star candidate |
| · · Candidate_BSS | candidate blue straggler Star |
| · · Candidate_WD* | white dwarf candidate |
| · · Candidate_NS | neutron star candidate |
| · · Candidate_BH | black hole candidate |
| · · Candidate_SN* | supernova candidate |
| · · Candidate_low-mass* | low-mass star candidate |
| · · Candidate_brownD* | brown dwarf candidate |
| Multiple objects | |
| multiple_object | composite object |
| · Region | region defined in the sky |
| · · Void | underdense region of the Universe |
| · SuperClG | supercluster of galaxies |
| · ClG | cluster of galaxies |
| · GroupG | group of galaxies |
| · · Compact_Gr_G | compact group of galaxies |
| · · Gr_QSO | group of quasars |
| · PairG | pair of galaxies |
| · · IG | interacting galaxies |
| · GlCl? | possible globular cluster |
| · Cl* | cluster of stars |
| · · GlCl | globular cluster |
| · · OpCl | open (galactic) cluster |
| · Assoc* | association of stars |
| · ** | double, binary or multiple star |
| · · EB* | eclipsing binary |
| · · · EB*Algol | eclipsing binary of Algol type |
| · · · EB*betLyr | eclipsing binary of beta Lyr type |
| · · · EB*WUMa | eclipsing binary of W UMa type |
| · · · EB*Planet | star showing eclipses by its planet |
| · · SB | spectroscopic binary |
| · · CataclyV* | cataclysmic variable star |
| · · · DQHer | cataclysmic var. DQ Her type |
| · · · AMHer | cataclysmic var. AM Her type |
| · · · Nova-like | nova-like star |
| · · · Nova | nova |
| · · · DwarfNova | dwarf nova |
| · · XB | X-ray binary |
| · · · LMXB | low mass X-ray binary |
| · · · HMXB | high mass X-ray binary |
| · *** | star field |
| Interstellar matter | |
| ISM | insterstellar matter |
| · PartofCloud | part of cloud |
| · PN? | possible planetary nebula |
| · ComGlob | cometary globule |
| · Bubble | bubble |
| · EmObj | emission object |
| · Cloud | cloud or nebula |
| · · GalNeb | galactic nebula |
| · · BrNeb | bright nebula |
| · · DkNeb | dark cloud (nebula) |
| · · RfNeb | reflection nebula |
| · · MolCld | molecular cloud |
| · · · Globule | globule (low-mass dark cloud) |
| · · · denseCore | dense core inside a molecular cloud |
| · · HVCld | high-velocity cloud |
| · · BiNeb | bipolar nebula |
| · · GasNeb | gaseous nebula |
| · HII | HII (ionized) region |
| · PN | planetary nebula |
| · HIshell | HI shell |
| · SNR? | supernova remnant candidate |
| · SNR | supernova remnant |
| · Circumstellar | circumstellar matter |
| · · outflow? | outflow candidate |
| · · Outflow | outflow |
| · · OutflowJet | outflow or jet |
| · · HH | Herbig-Haro object |
| Stars | |
| Star | star |
| · *inCl | star in cluster |
| · *inNeb | star in nebula |
| · *inAssoc | star in association |
| · *in** | star in double system |
| · V*? | star suspected of variability |
| · Pec* | peculiar star |
| · · HB* | horizontal branch star |
| · · YSO | young stellar object |
| · · Em* | emission-line star |
| · · · Be* | Be star |
| · · BlueStraggler | blue straggler star |
| · · RGB* | red giant branch star |
| · · AGB* | asymptotic giant branch star (He-burning) |
| · · · C* | carbon star |
| · · · S* | S star |
| · · RSG* | red supergiant star |
| · · post-AGB* | post-AGB star (proto-PN) |
| · · WD* | white dwarf |
| · · · pulsWD* | pulsating white dwarf |
| · · low-mass* | low-mass star (M<1solMass) |
| · · brownD* | brown dwarf (M<0.08solMass) |
| · · OH/IR | star with envelope of OH/IR type |
| · · CH | star with envelope of CH type |
| · · pMS* | pre-main sequence star |
| · · · TTau* | T Tau-type star |
| · · WR* | Wolf-Rayet star |
| · · NS* | neutron star |
| · · BH* | black hole |
| · PM* | high proper-motion star |
| · · near* | nearby star |
| · HV* | high-velocity star |
| · V* | variable star |
| · · Irregular_V* | variable star of irregular type |
| · · · Orion_V* | variable star of Orion type |
| · · · Rapid_Irreg_V* | variable star with rapid variations |
| · · Eruptive* | eruptive variable star |
| · · · Flare* | flare star |
| · · · FUOr | variable star of FU Ori type |
| · · · Erupt*RCrB | variable star of R CrB type |
| · · RotV* | rotationally variable star |
| · · · RotV*alf2CVn | variable star of alpha2 CVn type |
| · · · RotV*Ell | ellipsoidal variable star |
| · · · Pulsar | pulsar |
| · · · BYDra | variable of BY Dra type |
| · · · RSCVn | variable of RS CVn type |
| · · PulsV* | pulsating variable star |
| · · · RRLyr | variable star of RR Lyr type |
| · · · Cepheid | Cepheid variable star |
| · · · PulsV*delSct | variable star of delta Sct type |
| · · · PulsV*RVTau | variable star of RV Tau type |
| · · · PulsV*WVir | variable star of W Vir type |
| · · · PulsV*bCep | variable star of beta Cep type |
| · · · deltaCep | classical Cepheid (delta Cep type) |
| · · · gammaDor | variable star of gamma Dor type |
| · · LPV* | long-period variable star |
| · · · Mira | variable Star of Mira Cet type |
| · · · semi-regV* | semi-regular pulsating star |
| · · SN | supernova |
| · · Symbiotic* | symbiotic star |
| · Sub-stellar | sub-stellar object |
| · · Planet? | extra-solar planet candidate |
| · ExG* | isolated star (not a member of a particular galaxy) |
| Galaxies | |
| Galaxy | galaxy |
| · EllipticalG | elliptical galaxy |
| · SpiralG | spiral galaxy |
| · DwarfG | dwarf galaxy |
| · IrregG | irregular galaxy |
| · PartofG | part of a galaxy |
| · GinCl | galaxy in cluster of galaxies |
| · · BClG | brightest galaxy in a cluster (BCG) |
| · GinGroup | galaxy in group of galaxies |
| · GinPair | galaxy in Pair of galaxies |
| · High_z_G | galaxy with high redshift |
| · AbsLineSystem | absorption line system |
| · · Ly-alpha_ALS | Ly alpha absorption line system |
| · · DLy-alpha_ALS | damped Ly-alpha absorption line system |
| · · metal_ALS | metallic absorption line system |
| · · Ly-limit_ALS | Lyman limit system |
| · · Broad_ALS | broad absorption line system |
| · RadioG | radio galaxy |
| · HII_G | HII galaxy |
| · LSB_G | low surface brightness galaxy |
| · AGN_Candidate | possible active galactic nucleus |
| · · QSO_Candidate | possible quasar |
| · · Blazar_Candidate | possible blazar |
| · · BLLac_Candidate | possible BL Lac |
| · EmG | emission-line galaxy |
| · StarburstG | starburst galaxy |
| · BlueCompG | blue compact galaxy |
| · LensedImage | gravitationally lensed image |
| · · LensedG | gravitationally lensed image of a galaxy |
| · · LensedQ | gravitationally lensed image of a quasar |
| · AGN | active galactic nucleus |
| · · LINER | LINER-type active galactic nucleus |
| · · Seyfert | Seyfert galaxy |
| · · · Seyfert_1 | Seyfert 1 galaxy |
| · · · Seyfert_2 | Seyfert 2 galaxy |
| · · Blazar | blazar |
| · · · BLLac | BL Lac – type object |
| · · · OVV | optically violently variable object |
| · · QSO | quasar |
| · GSN | galaxy with supernova |
| Solar system objects | |
| Solar_System | Solar System object |
| · Planet | planet |
| · · Mercury | Mercury |
| · · Venus | Venus |
| · · Earth | Earth |
| · · Moon | Moon |
| · · Mars | Mars |
| · · Jupiter | Jupiter |
| · · Saturn | Saturn |
| · · Uranus | Uranus |
| · · Neptune | Neptune |
| · DwarfPlanet | dwarf planet |
| · · Pluto | Pluto |
| · · Ceres | Ceres |
| · · Haumea | Haumea |
| · · MakeMake | MakeMake |
| · · Eris | Eris |
| · sSSBody | small Solar System body |
| · · Comet | comet |
| · · Asteroid | asteroid |
| · TNO | Trans-Neptunian object |
| · PMoon | planetary moon |
| · PRing | planetary ring |
| Calibration | |
| Calib | calibration |
| Calib_S | standard |
| Calib_aS | astrometric standard |
| Calib_phS | photometric standard |
| Calib_sS | spectroscopic standard |
| Cal_polS | polarimetric standard |
| Cal_spS | spectropolarimetric standard |
| Cal_rvS | radial velocity standard |
| Cal_Flat | flat |
| Cal_SFlat | sky flat |
| Cal_DFlat | dome flat |
| Cal_Guide* | guide star |
| Man-made object | |
| mmObj | man-made object |
When you log in, the PIPT offers you remember your username and password so that the login form will prepopulated when you login next time. Your credentials will be saved in a file. The content of that file is sufficiently scrambled to avoid that someone can glance your username and password by accident, but it does not use safe encryption.
While on Unix systems the file permissions should be set correctly, it is your responsibility to ensure that nobody else has access to the file.
If you don't want to store your user credentials any longer just unselect the checkbox on the login panel.
Once you are ready to submit, you should use the menu item Proposal > Validate to check that your proposal doesn't contain any errors. If there are errors, you will get a list of error messages underneath the proposal XML.

The error messages may be a bit cryptic. In this case looking at the part of the XML where the error is raised might give you a better idea of where to look for the problem.
When your proposal is valid, you should check for warnings by using the menu item Proposal > Show Warnings. Do heed any warnings you get, as they might indicate that your proposal setup is not precisely what you expect it to be.
If you are convinced that all is well with your proposal you can start the submission process by means of the menu item Proposal > Submit. This will launch the submission dialog.
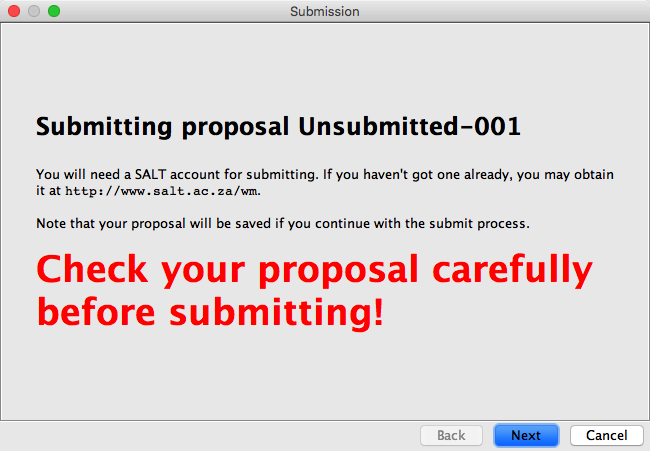
Pay attention to the proposal code shown (Unsubmitted-001 in the screen shot above). When you resubmit a proposal it should never be of the form Unsubmitted-nnn, but must be the proposal code of the resubmitted proposal.
Once you click the Next button your proposal is saved and the PIPT calculates for how many nights your targets are visible.
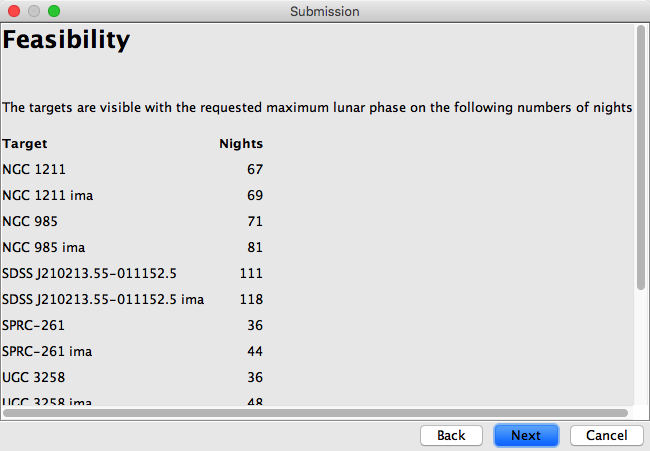
While nothing will prevent you from submitting a proposal which can only be observed on a handful of nights, the chances of such a proposal being accepted or even observed might be rather slim.
The next step in the submission process is that the PIPT checks whether all your investigators are in the science database. An investigator is deemed to be in the database if and only if there exists a user with the same email address in the database. You cannot submit a proposal with non-existing investigators.
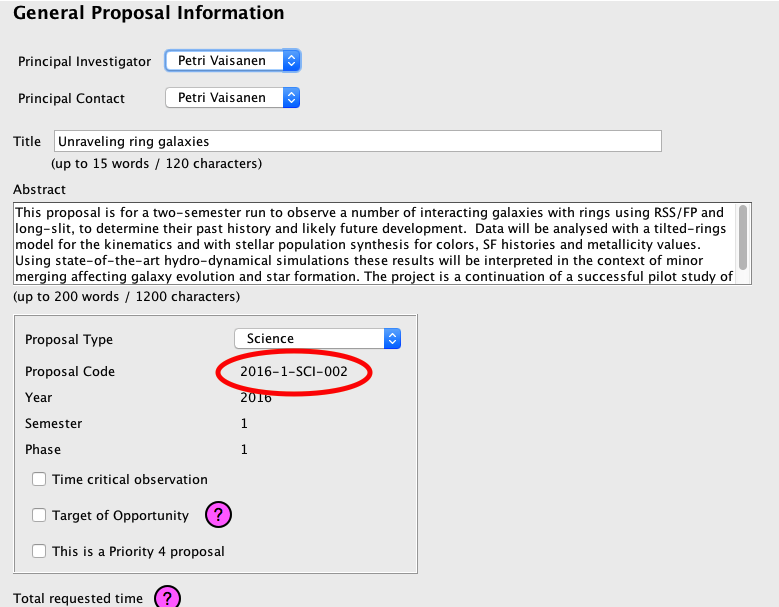
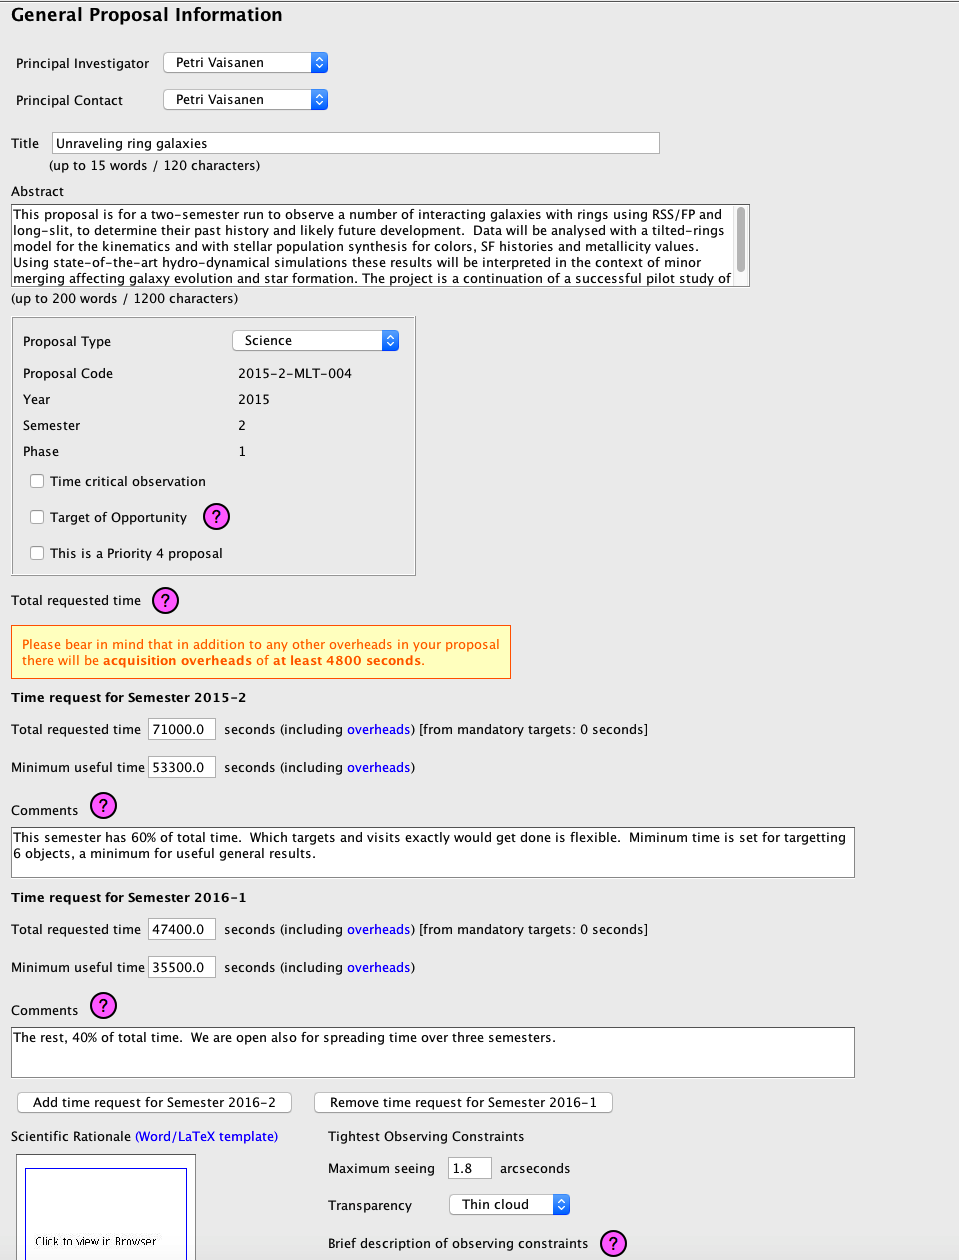
As the following example shows, it is easy to have an investigator in your proposal who apparently doesn't exist.
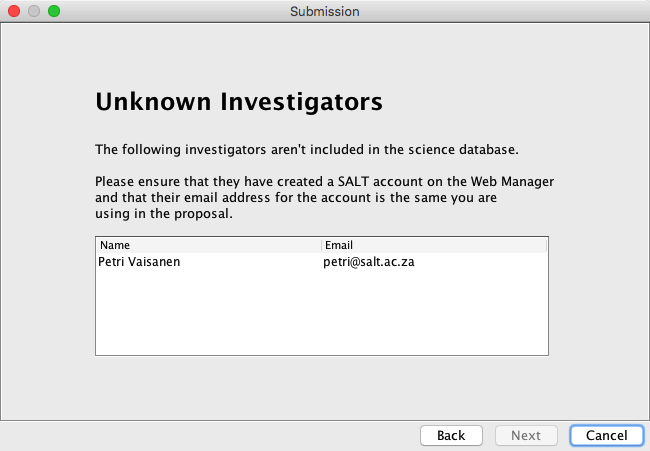
Here, Petri Vaisanen is a user who exists in the database, and the email address petri@salt.ac.za is perfectly valid. It just so happens that the email address in the database is petri@saao.ac.za...
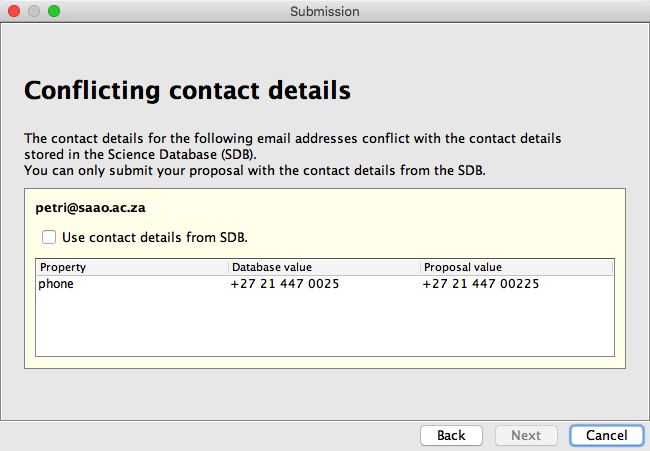
The PIPT also checks that the contact details in the proposal match those in the database for all the investigators. If that's not the case you have to confirm that the ones from the database may be used.
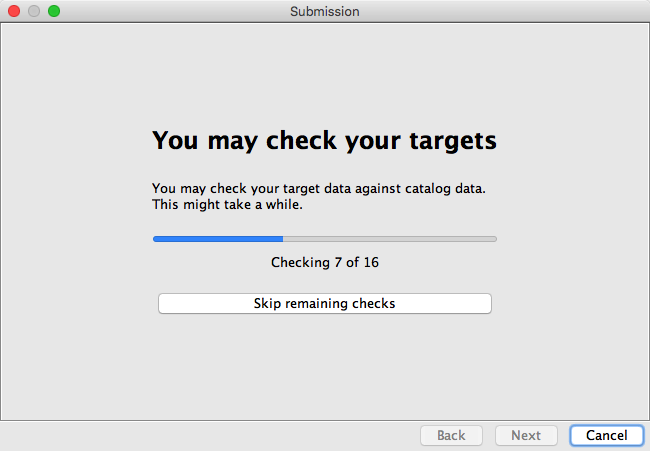
If all is well with the contact details the PIPT checks your target details by comparing them to the details SIMBAD, NED and VizieR return for the target name. As this may take a while and isn't always helpful, you may skip this check.
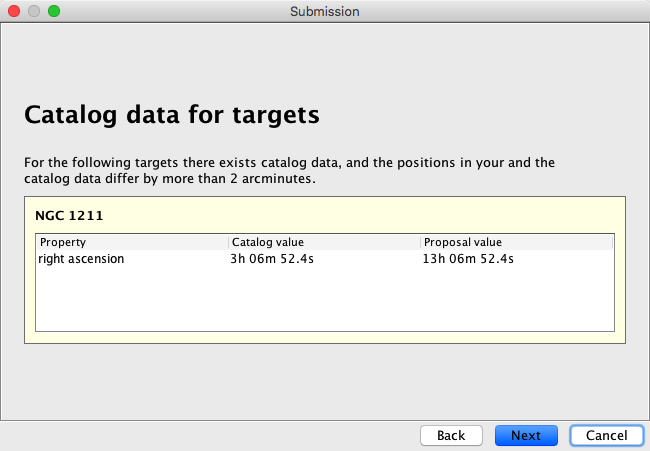
The PIPT will display any discrepancies found while checking the targets. This is for information purposes only; you can proceed with the submission if your details are correct.
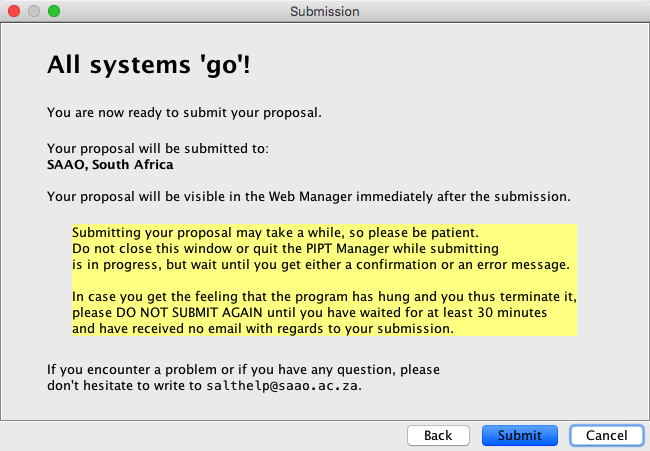
Finally the PIPT asks you to confirm that you really want to submit the proposal. Muster your courage, take a deep breath and hit the Submit button.
Depending on the size of your proposal it might take a few minutes for your proposal to be submitted. Once the submission is accomplished a success message is shown.
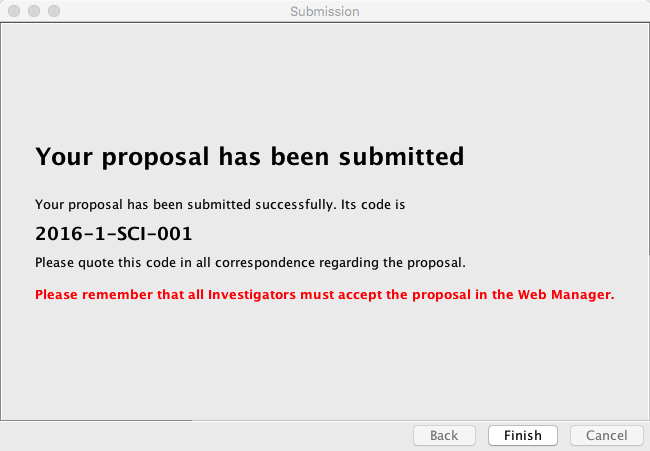
The proposal code shown in this message is the unique identifier for your proposal and remains the same across resubmissions. As noted above, the start window of the submission dialog always shows the proposal code, and you should ensure it is correct.
Of course things can wrong in life and you might get an error message, as your proposal couldn't be submitted. In this case you should fix the error and submit again.
In rare cases (and presumably under Windows only) you might get an error that the existing proposal content couldn't be moved. Chances are good that your proposal has been submitted in this case, and you should check whether this is the case before trying to resubmit.
After the successful submission of the proposal all investigators receive a confirmation email, which includes a link for accepting or rejecting the proposal.
Dear Christian Hettlage,

a SALT proposal has just been submitted with you as investigator.

Title: Unraveling ring galaxies

Abstract:
This proposal is for a two-semester run to observe a number of interacting galaxies with rings using RSS/FP and long-slit, to determine their past history and likely future development.  Data will be analysed with a tilted-rings model for the kinematics and with stellar population synthesis for colors, SF histories and metallicity values.  Using state-of-the-art hydro-dynamical simulations these results will be interpreted in the context of minor merging affecting galaxy evolution and star formation. The project is a continuation of a successful pilot study of a single coreless ring with an intriguing history and morphology.

Principal Investigator: Christian Hettlage (hettlage@saao.ac.za)
Principal Contact: Christian Hettlage (hettlage@saao.ac.za)

You have to approve of this proposal (or refuse it) by pointing your web browser to the following address:
http://www.salt.ac.za/wm/ApproveProposal/j4vN5Ir
Please note that the proposal will not be accepted until all the investigators have approved.

To get more information about the proposal, please login to the Web Manager at:
http://www.salt.ac.za/wm/

The proposal code for your proposal is 2016-1-SCI-002. You are kindly asked to quote it in the subject of all correspondence relating to the proposal.

If you have any questions, please feel free to reply to this email.

Sincerely,
Your SALT Team
Clicking on the link leads you to the page where you can approve (or reject) the proposal.
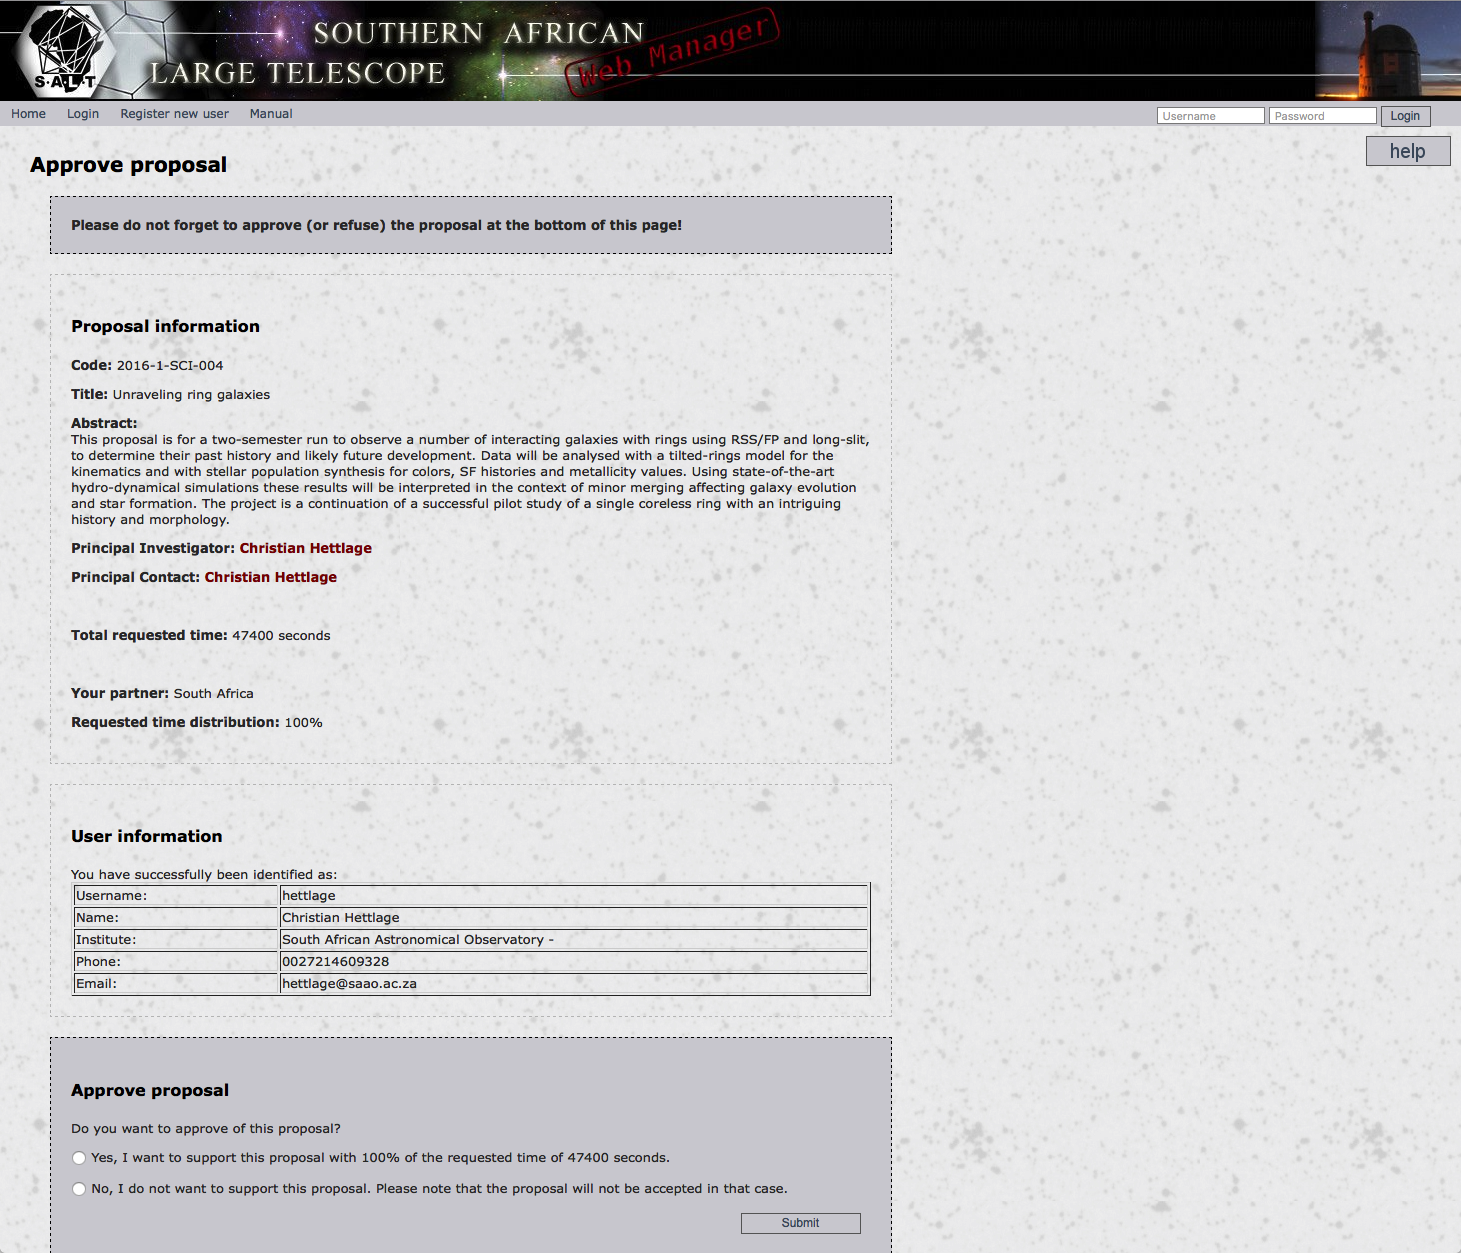
You shouldn't reject a proposal just because it contains an error. In this case you should rather resubmit it; see the next section. Similarly, don't reject erroneous submissions, but instead notify salthelp@salt.ac.za, so that a SALT Astronomer can delete your proposal.
It is a good idea to thoroughly check your proposal, and you can do this by pointing your browser to http://www.salt.ac.za/wm/proposal/your_proposal_code (where your_proposal_code must be replaced with the proposal's proposal code, such as 2016-1-SCI-002).
Of course it might happen that you've made a mistake in your proposal which needs to be fixed. If you notice this before the phase 1 deadline, that is no problem at all - just resubmit the proposal.
However, before making the change(s) you should double-check that the proposal code is correct. The code is shown not only in the label of the proposal's (root) node in the navigation tree, but also on the General Proposal Information form, which you get when clicking on that node.
If the proposal code starts with Unsubmitted-, the submission would create a new proposal. Clearly this is something you'd like to avoid.
But this might raise the question what to do if the proposal with the correct is nowhere to be found in the PIPT. The answer is straightforward; by means of the menu item Online > Import from Server you can always download the latest version of a submitted proposal (both for phase 1 and phase 2).
If you notice an error after the phase 1 deadline, you should contact salthelp@salt.ac.za, explaining what the issue is and why you feel a resubmission isnecessary.
After the TACs have made their time allocations, you will be informed by email of the outcome for your proposal. If you have been awarded time, you need to convert your proposal from phase 1 to phase 2. You can do this in two ways.
The structure of a phase 2 proposal looks as follows.
Proposal
  Investigators
    Investigator 1
    Investigator 2
    ...
  Targets
    Target 1
    Target 2
    ...
  Blocks
    Block 1
      Observation 1
        Acquisition 1
        Instrument setup 1
        Instrument setup 2
        ...
    Block 2
      Observation 2
        Acquisition 2
        Instrument setup 3
        Instrument setup 4
        ...
    ...
  Pools
    Pool 1
    Pool 2
    ...
You already know investigator and target elements from phase 1.
A block is the smallest schedulable unit in a proposal. In other words, a block is observed in one go, without any intermissions. As such you should make sure that your blocks aren't too long, as long blocks are harder to schedule and hence less likely to be observed. In addition weather conditions might deteriorate while a long block is observed.
If your block is longer than an hour and the observing conditions at some time after an hour fail to satisfy your requirements, your block won't be rejected.
In case you have to create more than a dozen or so of blocks it might be easier to generate them with an external script. This will be covered in a later section.
Pools are optional and will be explained in a later section.
Clearly new elements must be added to the proposal to get the required structure, and this is done in the same way as for a phase 1 proposal. Right clicks, be they on a navigation tree node label or on a table row, are still your friend.
Details about the forms for the various proposal elements are given in a later section.
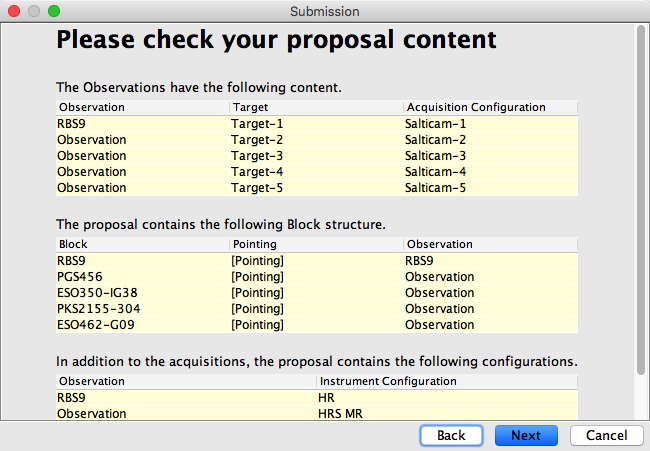
Proposal submission works in the same way as for phase 1. The only difference is that near its end the submission process includes an additional step allowing you to check the structure of your proposal.
Note that no confirmation email is sent to the investigators.
As with phase 1 proposals, it is a good idea to check your submission in the Web Manager and to resubmit if necessary.
The submitted proposal undergoes a technical review by your liaison SALT Astronomer (SA). If they spot an issue, they will send you an email. Once the SA is satisfied that the proposal can be observed as is, they will activate it, so that it appears in the queue at the telescope.
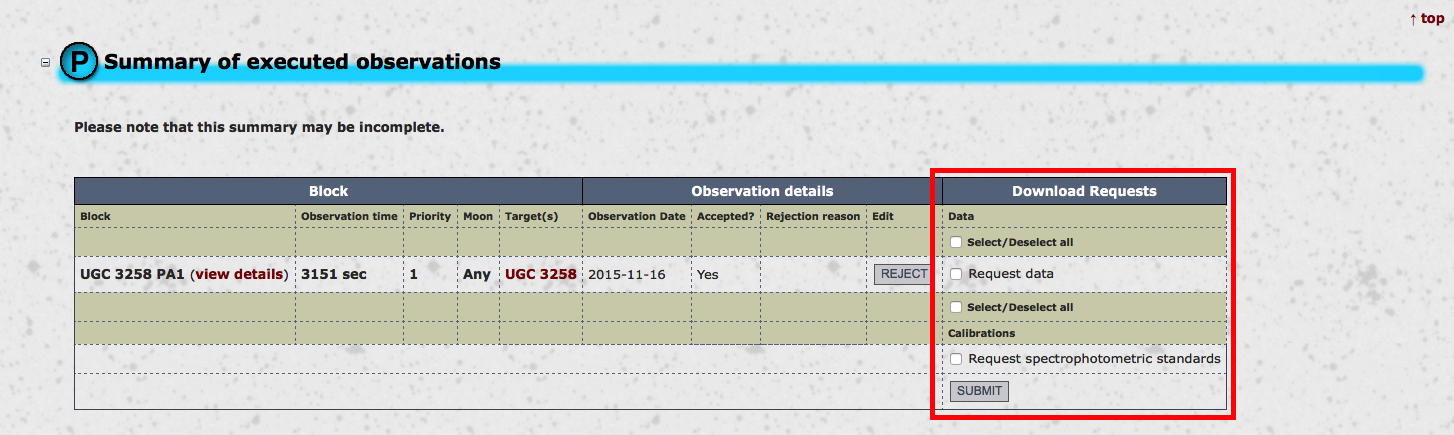
When an observation is taken for your proposal, you are sent an email with a link for downloading the data. The data is stored on the download server for a few days. After that you have to request the data to be put back onto the server, which you can do on your proposal's page in the Web Manager.
In most cases you don't have to worry about pools in your proposal and may just ignore them. But there are two exceptions.
The second case might need some explanation. So assume that you want to observe the same target ten times, with at least three days between the observations. Further assume that you were given time for five priority 1 observations and five priority 2 observations.
Then you might think that all you have to do is to create a priority 1 block with five visits and a priority 2 block with five visits, setting the wait period to three days for both. Then indeed two observations of the priority 1 block will be at least three days apart, and two observations of the priority 2 block will be at least three days apart as well.
But you might still get an observation of the priority 1 block and an observation of the priority 2 block during the same night. To avoid this you would define a pool with a wait period of three days and add the two blocks to this pool.
While a handful of blocks can be added with reasonable effort, adding dozens of blocks is tedious and error-prone. For such cases it makes much more sense to generate the blocks with an external script and then import them into the proposal.
To do so define a block with the setup you want to use. You can use arbritrary values for the exposure times etc., the important aspect is that the block is valid. You should use the menu item Proposal > Validate to check this.
Select this block in the navigation tree and scroll down to the bottom of the form. You should find a button Export as Template.
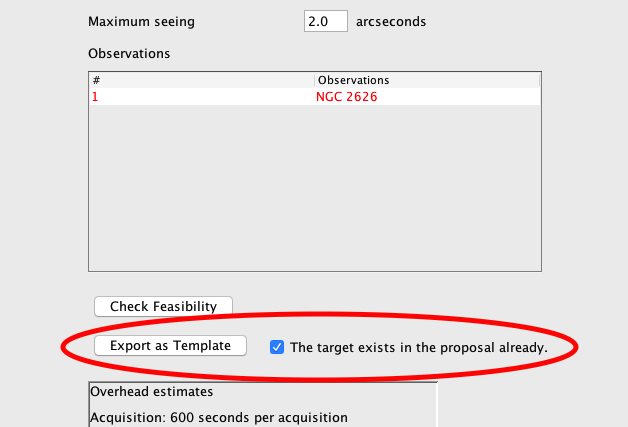
Use this button to export the block. The checkbox to the right of the button lets you specify whether the template should assume that the target for the block exists in the proposal already. If that is indeed the case, only the target name is defined in the template; otherwise the full target details are included.
You'll get an XML file with the block details, which contains various placeholders:
--INSERT NAME----INSERT TARGET NAME----INSERT ABSOLUTE FILE PATH----INSERT ABSOLUTE FILE PATH OR AUTOMATIC--auto-generated. In case of the latter the finding chart will be generated when importing the block or when submitting the proposal. The generated finding chart will be the same as the one you get when generating the finding chart on the acquisition form in the PIPT. If you don't want to use the default image server (POSS2/UKSTU Red), you may replace the <ns:Path>...</ns:Path> with <ns:ImageServer>image server</ns:ImageServer>. Here ns must be replaced by whatever prefix is used for the Path element.
The following image servers can be chosen for auto-generating a finding chart. It is your responsibility to ensure that the chosen server actually covers your target location.
| Accepted image server names |
|---|
| POSS2/UKSTU Red |
| POSS2/UKSTU Blue |
| POSS2/UKSTU IR |
| POSS1 Red |
| POSS1 Blue |
| 2MASS-J |
| 2MASS-H |
| 2MASS-K |
It is your responsibility to ensure that the target is covered by the image server you choose.
You should use this template to generate an xml file for each block in your proposal. All these generated files must be stored in the same directory, and they must have the extension .xml. When choosing filenames you should keep in mind that the PIPT will read in the files in alphabetical order. (If you use numbers in the filename, pad them with zeros to make sure that they all have the same length, as otherwise the order might not be what you expect.)
An example of how to generate the xml files is given below.
Once you have generated the files, you can select the Blocks element in the navigation tree. Its form contains a button for importing multiple blocks.
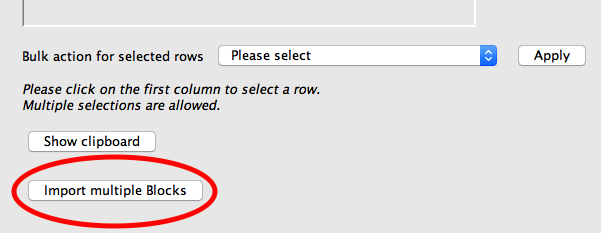
If you click on this button you get a dialog which allows you to make some choices regarding the import.
--INSERT NAME-- placeholders.Clicking on the Ok button starts the import.
At the time of writing, you cannot select the observations of imported blocks in the navigation tree. Saving the proposal and restarting the PIPT fixes this problem.
Let's assume we want to create xml files for four blocks, with target name, exposure time and block comments differing across the files. Then we could have a csv file with the following content.
Target,Exposure Time,Comments
NGC 985 PA1,900,The slit goes through two nuclei very close together in the "fat" part of the ring.
NGC 985 PA2,900,The slit goes through a section of the ring opposite to the nuclei.
UGC 3258 PA1,1200,This block has the slit going along the bar of the galaxy through the nucleus.
UGC 3258 PA2,1200,This block has the slit going along one side of the ring.
The folllowing Python script creates the xml files from this csv file.
#
# Example script for generating multiple blocks for the PIPT.
#
# The script reads the block template from an xml file and each block's details from a csv file. It sets the target
# name, exposure time, finding chart path (to 'auto-generated') and block comments.
#
# The csv file is assumed to have the columns 'Target', 'Exposure Time' and 'Comments'. For example:
#
# The xml files for the blocks are stored in a user-specified output directory with names of the form "BlockNNN.xml",
# where NNN is a running number.
#
# Usage: python block_generator.py path_to_block_template path_to_block_details_csv output_dir
#
# Namespaces (i.e. strings like 'http://www.salt.ac.za/PIPT/Proposal/Phase2/4.6', so please check them before using this
# script.

import xml.etree.ElementTree as ElementTree
import csv
import os
import sys

block_details_file = sys.argv[1]
block_template = sys.argv[2]
output_dir = sys.argv[3]

# read in block details
blocks = []
with open(block_details_file, 'r') as f:
    reader = csv.DictReader(f)
    for row in reader:
        blocks.append(row)

# generate file for each block
for index, block in enumerate(blocks):
    with open(block_template, 'r') as f:
        tree = ElementTree.parse(f)

        # set target name
        xpath = './/{http://www.salt.ac.za/PIPT/Proposal/Phase2/4.6}Acquisition/' \4.6
                '{http://www.salt.ac.za/PIPT/Proposal/Phase2/4.6}Target/' \
                '{http://www.salt.ac.za/PIPT/Proposal/Phase2/4.6}Name'
        targetName = tree.find(xpath)
        targetName.text = block['Target']

        # set exposure time
        xpath = './/{http://www.salt.ac.za/PIPT/RSS/Phase2/2.2}RssDetector/' \
                '{http://www.salt.ac.za/PIPT/RSS/Phase2/2.2}ExposureTime/' \
                '{http://www.salt.ac.za/PIPT/Shared/1.4}Value'
        exposureTimeValue = tree.find(xpath)
        exposureTimeValue.text = block['Exposure Time']

        # set finding chart path
        xpath = './/{http://www.salt.ac.za/PIPT/Proposal/Phase2/4.6}Acquisition/' \
                '{http://www.salt.ac.za/PIPT/Proposal/Phase2/4.6}FindingChart/' \
                '{http://www.salt.ac.za/PIPT/Proposal/Shared/2.6}Path'
        findingChartPath = tree.find(xpath)
        findingChartPath.text = 'auto-generated'

        # set block comments
        xpath = '{http://www.salt.ac.za/PIPT/Proposal/Phase2/4.6}Comments'
        comments = tree.find(xpath)
        comments.text = block['Comments']

        # name of the created file
        counter = index + 1
        if counter < 10:
            zeros = '00'
        elif counter < 100:
            zeros = '0'
        else:
            zeros = ''

        # output updated xml
        name = 'Block' + zeros + str(counter) + '.xml'
        path = os.path.join(output_dir, name)
        with open(path, 'w') as o:
            o.write(ElementTree.tostring(tree.find('.')))
While this script hopefully may serve as a starting point, you will undoubtedly have to tweak it to fit your needs. You should contact salthelp@salt.ac.za if you run into any troubles with this.
Having covered the general workflow for creating proposals, let us now turn to the nitty-gritty details of the various forms.
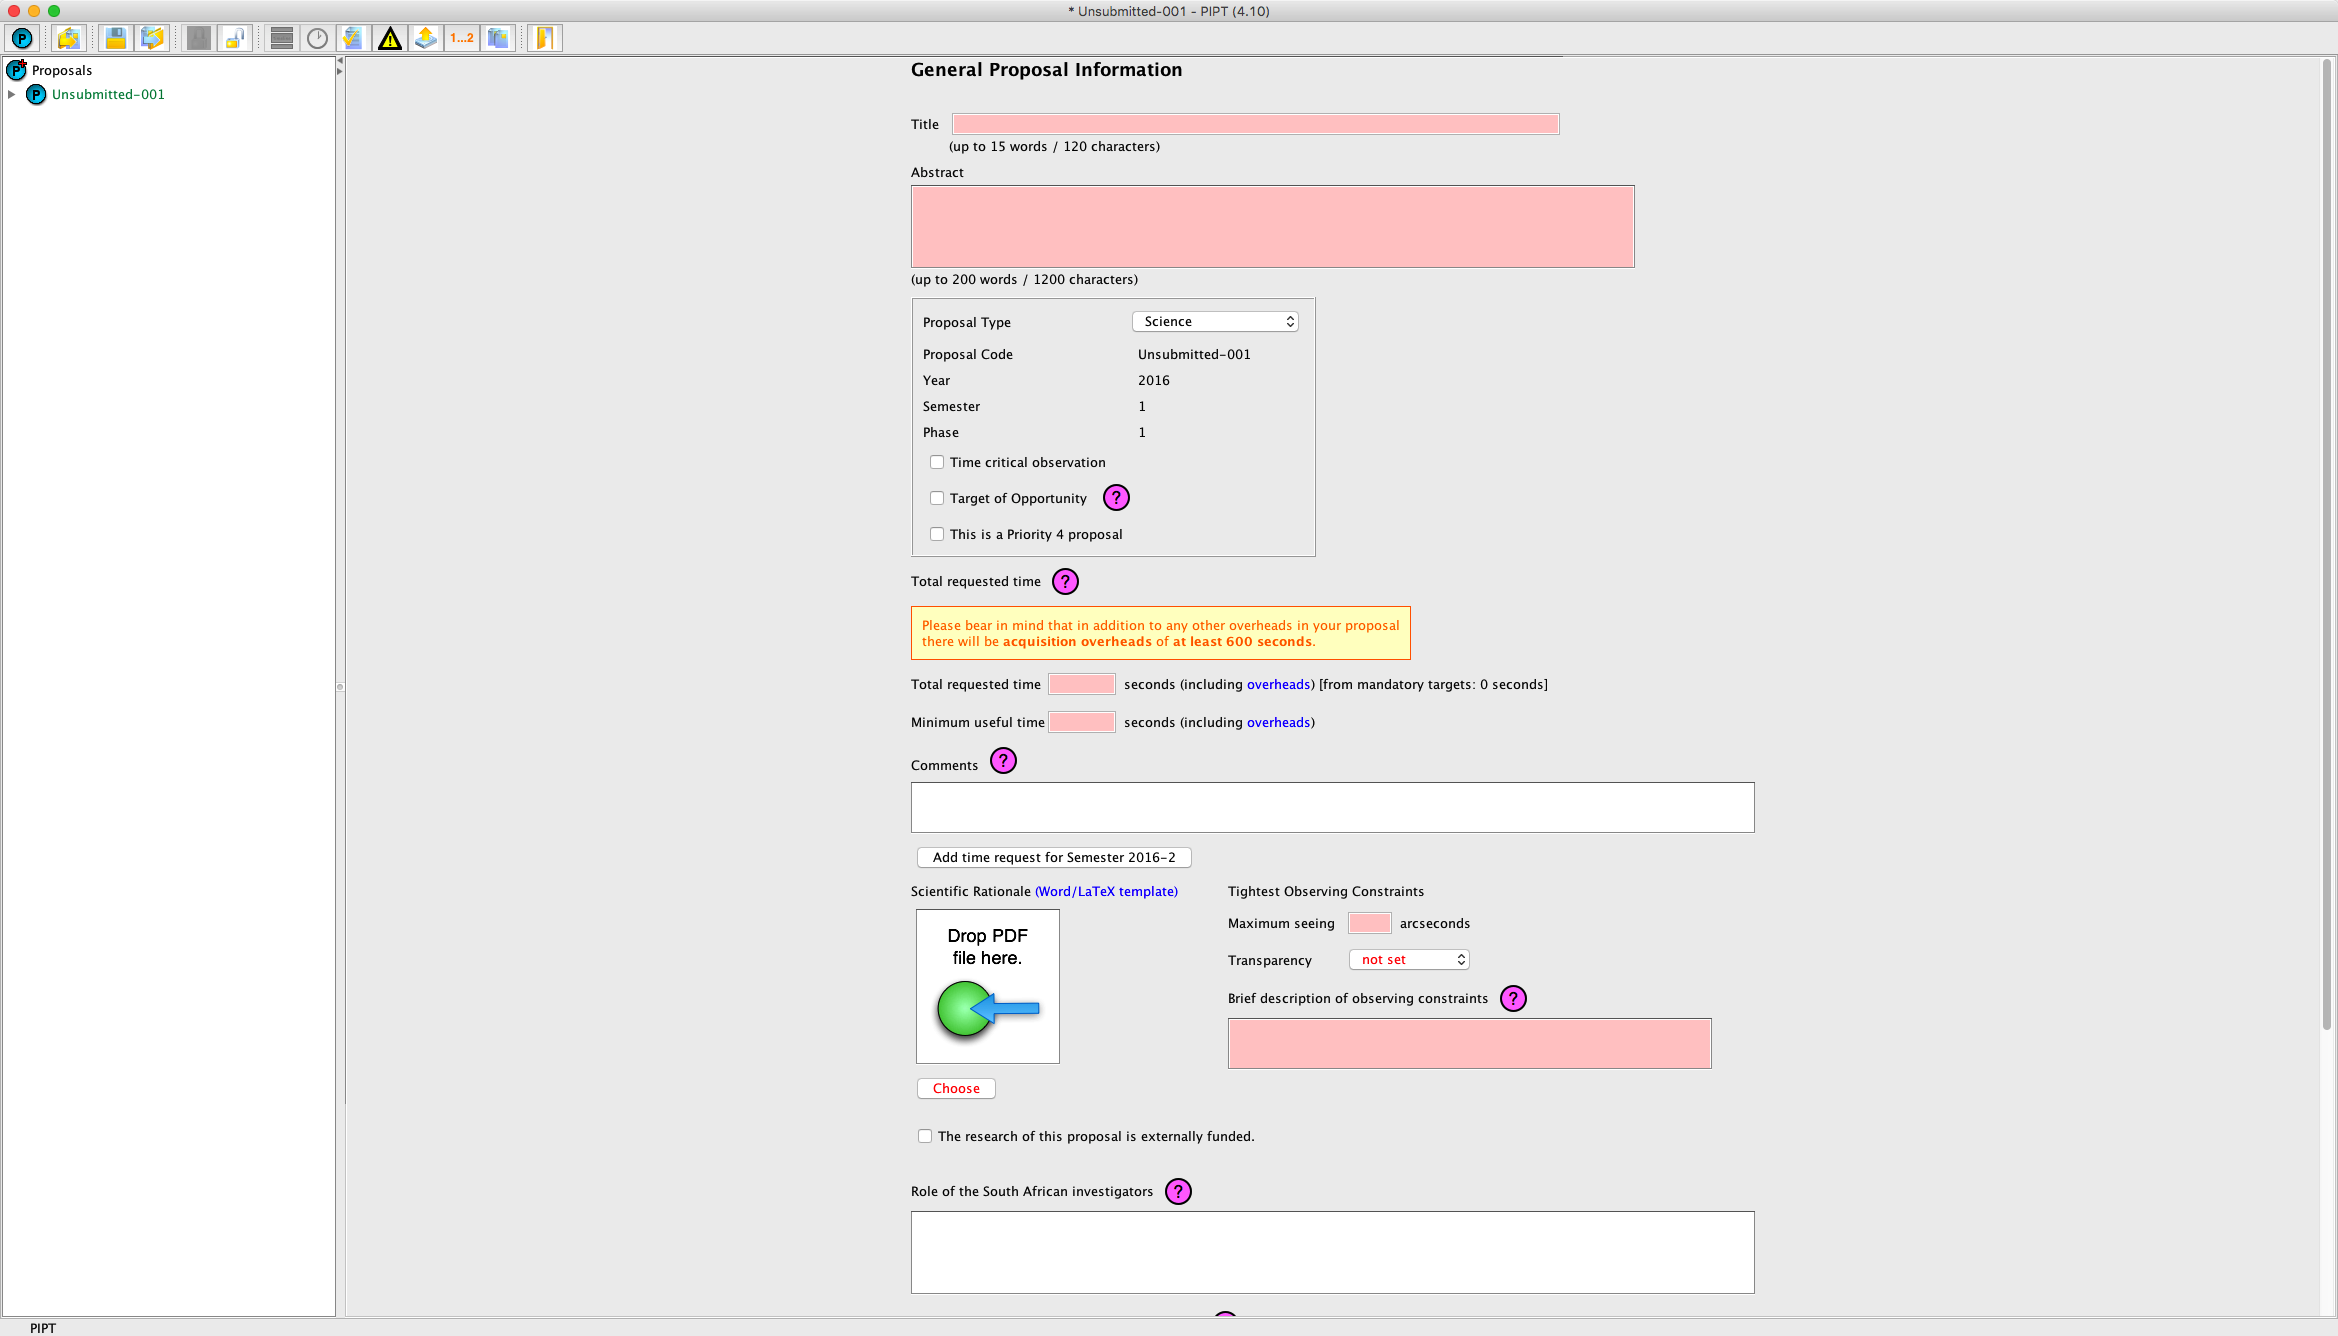
The general proposal information form asks for general information about the proposal.
Title.The proposal title, which shouldn't have more than 15 words and must not be longer than 120 characters.
Abstract. The proposal abstract, which shouldn't have more than 200 words and must not be longer than 1200 characters.
Proposal Type. The proposal type can be either Science or Key Science Project. Key science projects attempt to answer an important scientific topic through a concentrated effort of SALT observations, and they should involve cross-consortium collaboration. At this time, not all partners have committed time to this program. Please ask your SALT representative about the current status prior to submitting a proposal.
If in doubt, you should choose Science as the proposal type.
Proposal code. The unique identifier for your proposal. If the proposal hasn't been submitted yet, the code will be of the form Unsubmitted-.... If you are resubmitting an existing proposal, you should make sure that the proposal code isn't of this form, as otherwise your submission will result in a brand-new proposal being created.
In case you have any queries regarding your (submitted) proposal, you should always include the proposal code in the subject of your email to salthelp@salt.ac.za.
Year. The year when the proposal semester starts.
Semester. Whether the proposal semester is a summer or winter semester. The allowed values are 1 (from 1 May to 31 October) or 2 (from 1 November to 31 March).
You can change the semester using the menu item Proposal > Change Semester.
Phase. Notes that this proposal is for phase 1.
Time critical observation. Tick this checkbox if there is a time constraint for your observations.
Target of Opportunity. Tick this checkbox if you don't know the targets yet, for example because you are requesting time for supernova observations. Note that you still have to define a (dummy) target for the proposal (see the section on the target form).
This is a Priority 4 proposal. Tick this checkbox if you are requesting priority 4 time.
Total requested time. The total requested time for your proposal must include all the overheads, in particular the acquisition times. Please refer to the call for proposals document for a list of overhead times. (You can also create a (bogus) DDT proposal in the PIPT, define your observations and have the PIPT calculate the required overheads.)
Minimum useful time. The minimum time you need for obtaining useful results. This must include all overheads, and it may be equal to the total requested time if you want to request an "all-or-nothing" time allocation from your TAC.
Comments. Any information regarding the time request which the TAC should be aware of. An example would be to point out the Moon conditions you need for the minimum useful time.
Please keep the comments short and to the point. Longer comments should be included in the scientific justification.
Add time request for Semester ... If you require observations in more than one semester, you may add time requests for future semesters. When doing so, you should bear two things in mind:
Whereas the proposal code of "normal" proposals contains the string -SCI-, that of proposals requesting time for several semesters contains the string -MLT-. This stands short for "multi-semester".
Scientific Rationale. You can drop your scientific justification pdf onto the "Drop PDF file here" icon. Alternatively you can select the pdf by clicking on the Choose button underneath the icon.
The templates for the scientific justification are available from http://astronomers.salt.ac.za/proposals/proposal-templates/. Please ensure that you use the latest template and that you fill in all required sections. Also note there are special templates for key science project proposals.
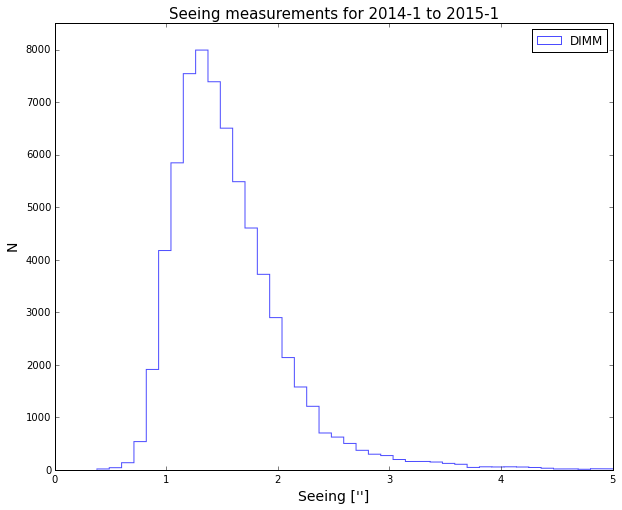
Maximum seeing. The maximum allowed seeing for your observations, in arcseconds. The plot below shows seeing histogram from the SAAO DIMM. The data are taken from the period from 1 May 2014 through 31 October 2015.
The following table indicates the expected best image quality performance of SALT (in terms of the FWHM and enclosed energy diameters (50% and 80%) of the PSF for different DIMM seeing values (all V-band). The PSF is basically described by a modified Moffat function.
| DIMM zenith seeing | Seeing at average telescope airmass | FWHM | EE50 | EE80 |
|---|---|---|---|---|
| 1.0” | 1.2” | 1.4” | 1.6” | 2.6” |
| 1.5” | 1.7” | 1.8” | 2.0” | 3.3” |
| 2.0” | 2.3” | 2.4” | 2.7” | 4.2” |
The value in the first column is the value to be inserted in the PIPT and used in the Simulator Tools. However, you should use the other values for planning the SNR. All the values assume a perfectly aligned primary mirror.
Please refer to the call for proposals for more details.
Transparency. The tightest weather conditions required for your proposal.
Brief description of observing constraints. You may provide further details regarding your observing conditions. Please don't use more than 20 words. An example might be
Reasonable image quality is needed for spatial resolution over the rings, seeing can be relaxed to 2.0". Gray is fine.
The research of this proposal is externally funded. If you want to acknowledge external funding you should tick this checkbox and supply the name of the funding agency.
Role of the South African investigators. In case you are requesting time from the South African TAC you need to outline the roles and responsibilities of the South African investigators. If you want to include a detailed description you might want to put it into the scientific justification.
Previous proposals for the last four semesters. If you are requesting time from the South African TAC you have to supply status information of all proposals for the last four semesters with the same Principal Investigator (PI) .
In case you are the PI of the proposal you are working on, you can request the list of proposals by clicking on the Get info from server button. Otherwise you'll have to add the proposals by means of the Add previous proposal info button.
The status should give the TAC an idea of how far the proposal has progressed and what science has come out of it so far. An example might be
The final semester of a large RSS program. All data reduced and analysed and several papers (still) in preparation as part of Ram Robukwe's PhD thesis. One related spin-off paper published: Prestov et al. 2042, ApJ, 623, L10. Project presented in several conferences and proceedings.
The names and reference in this example are fictitious.
If there are referred publications resulting from a previous proposal, you should add their Astrophysics Data System (ADS) bibcodes in the respective text field. You may enter one bibcode per line, or separate the bibcodes with a comma. Examples of ADS bibcodes are 2013MNRAS.430.2302T or 2015A&A...576A.119T.
You may include the status of proposals with a different PI, as long as they are of relevance. Use the Add proposal info button for this.
If you have status information in another proposal in the PIPT, you may use the Add info from other proposal button to import it into the current proposal.
Short summary for the general public. A brief explanation of the scientific justification, which is aimed at non-astronomers. While this is required only for proposals requesting time from the South African TAC, you are strongly encouraged to always provide it in order to increase the public awareness of SALT.
May the title, partners, PI and summary be displayed to the general public during an observation? There are plans to show the image of the all sky camera during SALT observations. The title, partners, Principal Investigator and (if supplied) summary for the general public can be displayed along with this image, if you consent.
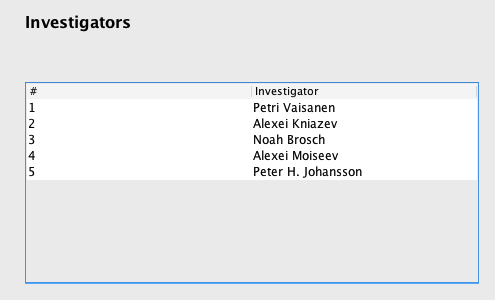
The investigators form just contains the table of investigators, which you may use to add or remove investigators from the proposal.
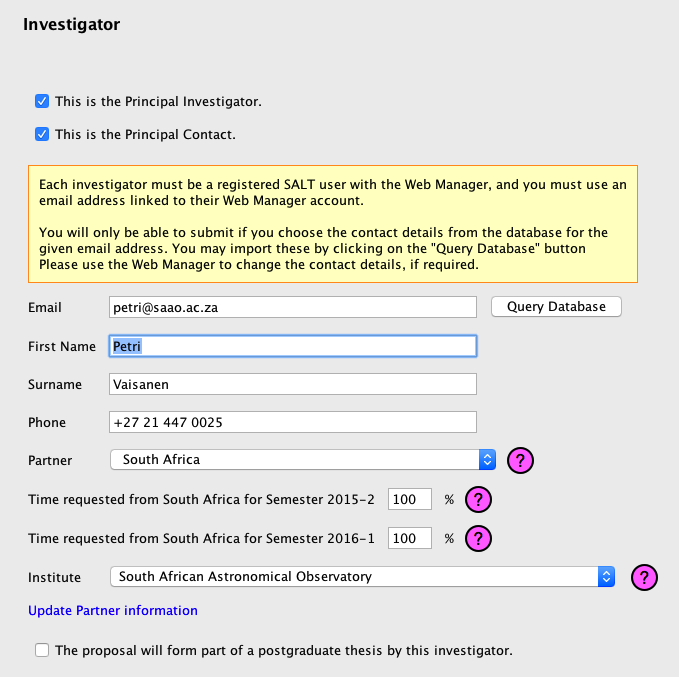
The investigator form lets you specify an investigator's contact details as well as their role and the share of time requested from their partner.
Each investigator in a proposal must have a Web Manager account. As investigators are identified by email address, you should make sure that the email address in the proposal and in the Web Manager match.
You won't be able to submit a proposal if any investigator doesn't have a Web Manager account.
This is the Principal Investigator. Tick this checkbox if this investigator is the Principal Investigator (PI) for the proposal. There can only be one PI.
This is the Principal Contact. Tick this checkbox if this investigator is the Principal Contact (PC) for the proposal. There can only be one PC.
E-Mail. The investigator's email address. This must match the email address used for the Web Manager account.
You may use the Query Database button for populating the investigator's contact details from the science database. Using it has the additional benefit that it checks whether the investigator already has a Web Manager account with the given email address.
First Name. The investigator's given name(s).
Surname. The investigator's surname.
Phone. The investigator's phone number.
Partner. The SALT partner which the investigator is affiliated to. If the investigator doesn't belong to any SALT partner, you should select Other from the dropdown list.
Time requested from ... The percentage of time requested from the investigator's partner. The percentages for all partners must add up to 100 %. The percentage must always be 0 for the partner Other as only SALT partners may allocate time.
A percentage has to be supplied for all semesters you are requesting time for.
Institute. The institute you are affiliated to. What to do if your institute isn't in the list depends on the partner. If the partner is a SALT partner, you should contact salthelp@salt.ac.za. Please include the name, department, website URL and address of the institute in your mail.
If, on the other hand, the partner is Other, you may add the institute to the science database when registering for the Web Manager account or when adding contact details to your account. Choose ADD NEW INSTITUTE from the institute dropdown list on the respective Web Manager form, as shown below.

Once you've added the missing institute to the database you'll have to update the partner information in the PIPT. This can be achieved by clicking on the Update Partner information link underneath the institute dropdown list.
The proposal will form part of a postgraduate thesis by this investigator. If you tick this checkbox, you'll be asked for more details, as described in the following.
Type of degree. The type of degree towards which the investigator is studying.
Year of completion. The (estimated) year when the investigator's thesis will be submitted.
Importance and contribution to the thesis. A brief explanation of the role this proposal will play in the thesis. An example might be
"Ram Robukwe is using the RSS spectra to analyse the stellar populations in the target galaxies for his PhD thesis. He developed an automated pipeline to reduce and analyse RSS data as part of his MSc project. "
The name in this example is fictitious.
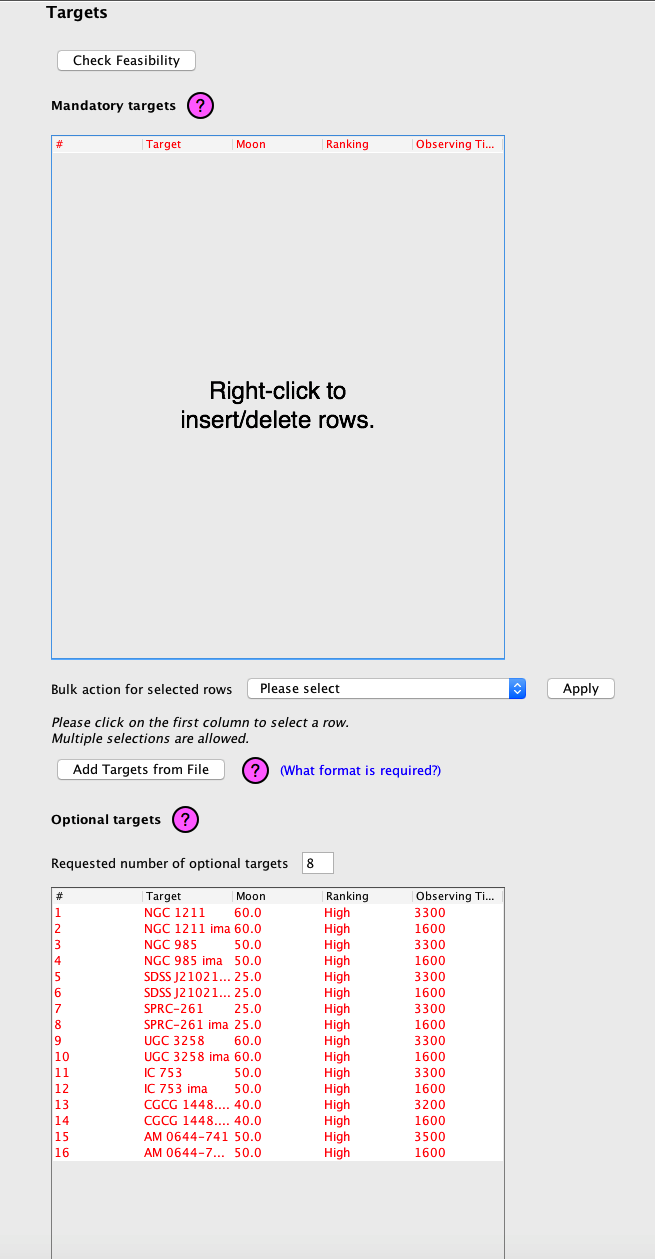
The targets form lists the mandatory and optional targets. A target is mandatory if you want to have this particular target observed. It is optional if it belongs to a set of targets out of which only a subset is supposed to be observed. So optional targets will mostly be used in survey proposals.
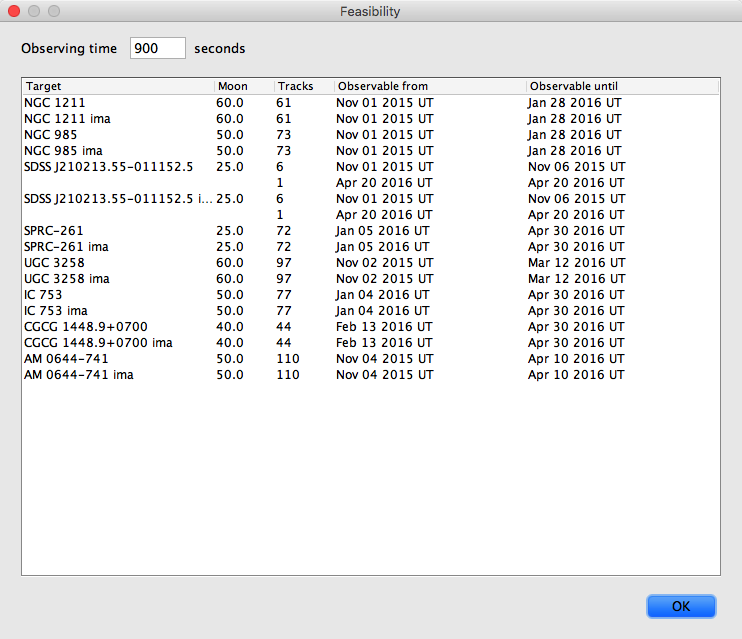
Check Feasibility. The feasibility check shows the number of tracks for the targets, assuming a given observing time. You should make sure that your targets are visible for a sufficient number of nights.
Mandatory targets. The table of mandatory targets lets you add and remove (mandatory) targets from the proposal.
Bulk action for selected rows. You may select targets by clicking on the first table column, and you may then apply either of two bulk actions:
Add Targets from File. You may add (mandatory) targets from a csv file, as explained in more detail elsewhere.
Optional targets. The table of optional targets lets you add and remove (optional) targets from the proposal. The same bulk actions as for mandatory targets are available, and you may also import targets from file.
Show clipboard. Opens a window with the clipboard content.
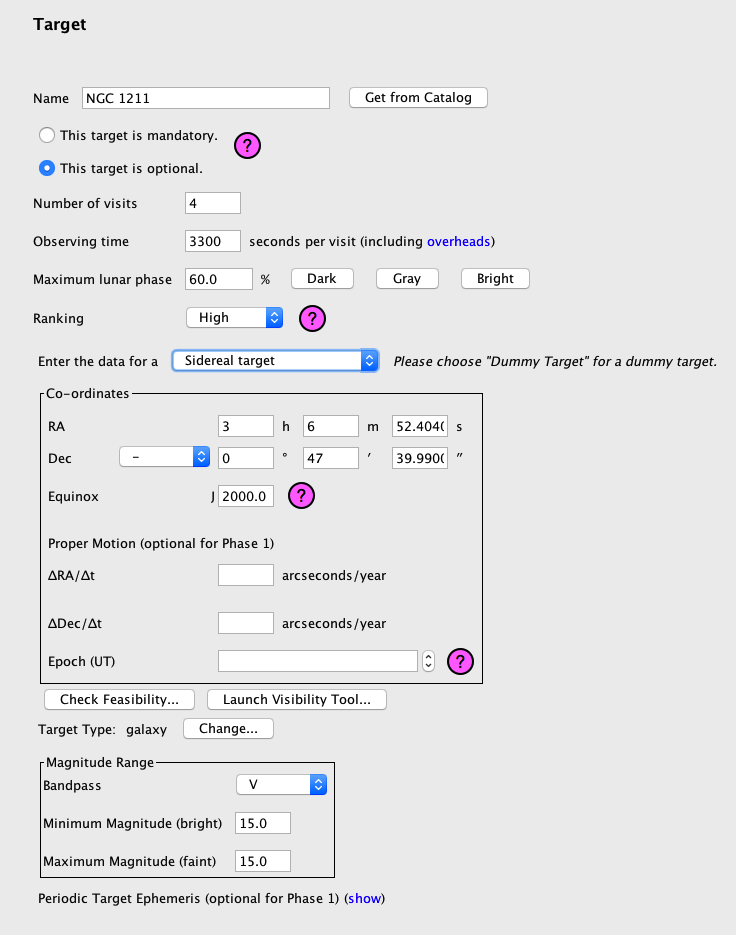
The target form records all the nitty-gritty details for a target.
Name. The target name. You can choose any name you like, but the name must be unique within the proposal.
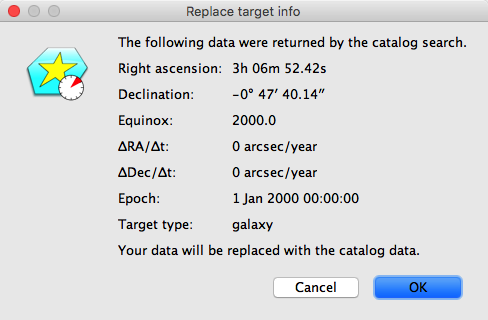
Get from Catalog. If your target name is included in SIMBAD, NED or VizieR, you may use this button to look up the target details in these catalogs. If the target is found, you'll be shown the details, and you can decide whether to use them.
This target is mandatory. / This target is optional. Choose whether the target is mandatory or optional. See the [section on the Targets form][targets_form] for an explanation of what this means.
Number of visits. The number of times you want the target to be observed.
Observing time. The observing time per visit, including all overheads (and in particular including acquisition times) . The value is used when checking the feasibility of your observation. Refer to the call for proposals for a list of overheads. Alternatively, you may create a "fake" phase 2 proposal (by choosing Commissioning as proposal type) - just make sure you don't submit that proposal.
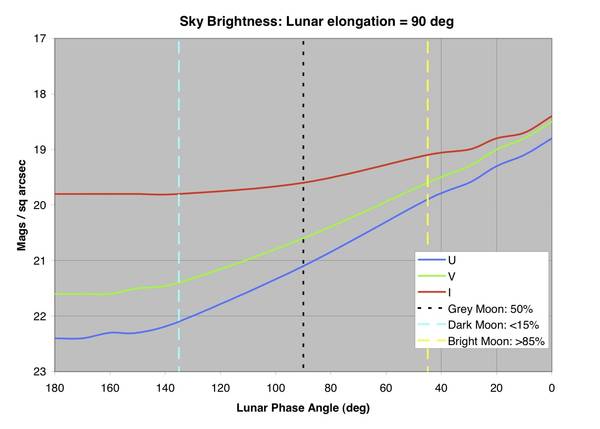
Maximum lunar phase. The maximum percentage of the illuminated lunar disk for which your observation can be done. For convenience, there are buttons for setting the value to dark (14.6 %), grey (85.4 %) and bright (100 %).
An estimate of the sky background as a function of the lunar phase is shown in the plot below.
Ranking. The importance of this observation relative to the other observations in your proposal. If all the observations in your proposal are of equal importance, you should choose High as the ranking.
Enter the data for a ... This dropdown menu lets you choose the target type.
The various target types require you to provide different details, and these will be covered below.
Target type. The type of your target. Click on the Change button to get a popup window with the available types.
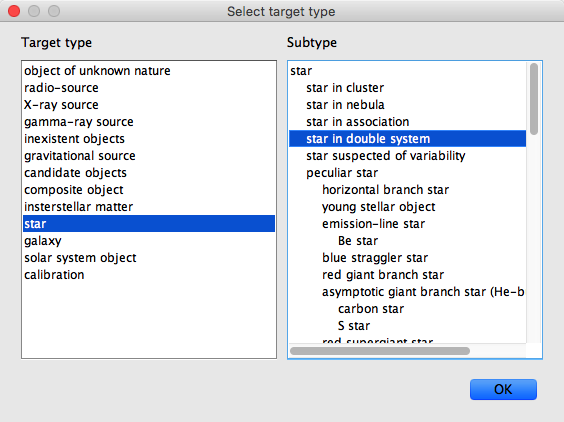
Choose a target type and then a subtype from the list of subtypes for this type.
Magnitude range. The magnitude range of your target. You have to choose the bandpass for which the magnitudes are given, as well as the minimum ("brightest") and maximum ("faintest") magnitude. Of course the minimum and maximum magnitude may be the same.
Periodic target ephemeris. If your target is periodic (for example because it is an eclipsing binary) and you want to limit observations to a certain phase range, you need to specify the periodicity. To do so, click on the show link. You can then enter T~0, the time base, the period and the period change, as described in the following.
T~0. A time (in the chosen time base) for which your target's phase is 0.
Time base. The time base for T~0. You may choose from the following options.
While both BJD and HJD are offered, they are treated as the same internally. Hence there may be an inaccuracy of a few seconds.
Period. The length of the period (at T~0).
Pdot. The difference in period length between one period and the next. For example, if T~0 = 2457378, Period = 1 day and Pdot = 0.5 days/day, then the first period (from T~0) runs from 2457378 to 2457379, the second from 2457379 to 2457380.5 and the third from 2457380.5 to 2457382.5.
Let us finally turn to the details specific to the various target types.
RA. The right ascension of the target, given in hours, minutes and seconds. If the target has a proper motion, this value refers to the specified epoch (see below).
Dec. The declination of the target, given in degrees, arcminutes and arcseconds. If the target has a proper motion, this value refers to the specified epoch (see below).
Equinox. The equinox for which the right ascension and declination are given. This must be an integer or float such as 2000 or 2000.0. It is supposed to be a Julian year.
ΔRA/Δt. The proper motion in right ascension. It must be given in arcseconds per year (not in seconds per year).
ΔDec/Δt. The proper motion in declination. It must be given in arcseconds per year.
Epoch (UT). The datetime (in Universal Time) when the target had the position specified above.
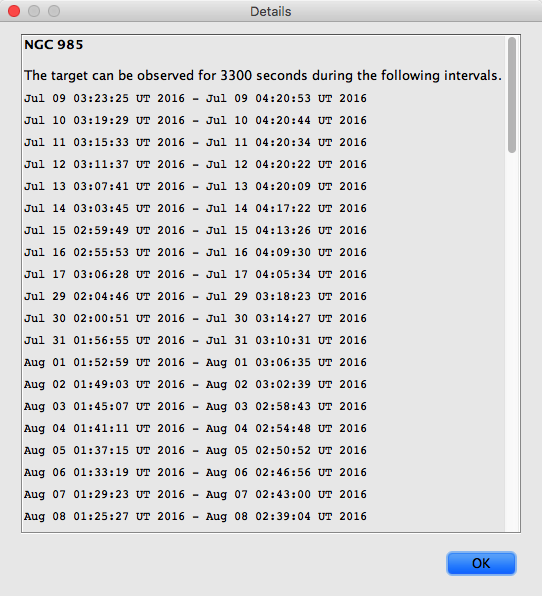
Feasibility. Once you have specified the target position and observing time, this button lets you check how many tracks will be available for your target.

The Details link on the feasibility window lets you view the full details of the available tracks.
Launch Visibility Tool. This button launches the Visibility Tool, using the target position you've specified.
If your target is included in the HORIZONS database (see below), you should define a NASA JPL Horizons target rather than a non-sidereal target.
Choose Target Data. This button lets you choose the file from which to read in the positional data for your target. If afterwards you load another file, the existing data will be overwritten in the proposal.
The file to load must be of the following form.
equinox: year
proper motion units: units
line for time and position 1
line for time and position 2
line for time and position 3
...
Empty lines, as well as leading and trailing white space, are ignored. Text following a pound sign (#) is interpreted as a comment. UTF-8 should be used as encoding.
The first (non-empty, non-comment) line in the file must define the equinox. It must start with the keyword "equinox", followed by a colon and the equinox as an integer or float value, such as 2000 or 2000.0. The case of the "equinox" keyword doesn't matter, so "equinox", "Equinox" or even "eQUInox" all work fine.
The second line must define the units for the proper motions. It must start with the string "proper motion units", followed by a colon and the units. The units can be either "arcsec/hour" or "arcsec/day". The case of the "proper motion units" string doesn't matter, so that for example you may use "Proper Motion Units" as well.
Each line defining a target position must have the format
Datetime RA\_h RA\_m RA\_s Dec\_deg Dec\_arcmin Dec\_arcsec PM\_RA PM\_Dec
or the format
Datetime RA\_angle Dec\_angle PM\_RA PM\_Dec}
The datetime must be specified as
CCYY-MM-DDThh:mm:ss.s
(or, more precisely, the format expected by the xs:dateTime type in an XML Schema has to be used). Example values for the datetime are 2010-11-03T08:17:56 and 2009-05-30T23:12:18.9435.
The other quantities in each line are listed in the table below.
| Quantity | Explanation |
|---|---|
| Datetime | date and time (see main text for format) |
| RA_h | right ascension hours (an integer between 0 and 23) |
| RA_m | right ascension minutes (an integer between 0 and 59) |
| RA_s | right ascension seconds (a float value between 0 (inclusive) and 60 (exclusive)) |
| Dec_deg | declination degrees ('+' or '-' followed by an integer between 0 and 89) |
| Dec_arcmin | declination arcminutes (an integer between 0 and 59) |
| Dec_arcsec | declination arcseconds (a float value between 0 (inclusive) and 60 (exclusive) |
| PM_RA | proper motion in right ascension |
| PM_Dec | proper motion in declination |
| RA_angle | right ascension as an angle between 0 (inclusive) and 360 degrees (exclusive) |
| Dec_angle | declination as an angle between -90 and 90 degrees (both inclusive) |
Here is an example file.
# Data for a non-sidereal target.

equinox: 2000.0
proper motion units: arcsec/hour

2009-05-22T17:00:00 16 49 13.81 -13 25 44.9 -28.1 -7.5
2009-05-22T18:00:00 16 49 11.94 -13 25 37.4 -28.1 -7.5
2009-05-22T19:00:00 16 49 10.08 -13 25 29.9 -28.1 -7.5
2009-05-22T20:00:00 16 49  8.21 -13 25 22.4 -28.1 -7.5
2009-05-22T21:00:00 16 49  6.34 -13 25 14.9 -28.1 -7.5
2009-05-22T22:00:00 16 49  4.48 -13 25  7.4 -28.1 -7.5
2009-05-22T23:00:00 16 49  2.61 -13 24 59.9 -28.1 -7.5
2009-05-23T00:00:00 16 49  0.74 -13 24 52.5 -28.1 -7.5
2009-05-23T01:00:00 16 48 58.87 -13 24 45.0 -28.1 -7.5
2009-05-23T02:00:00 16 48 57.00 -13 24 37.5 -28.2 -7.5
2009-05-23T03:00:00 16 48 55.12 -13 24 30.0 -28.1 -7.5
2009-05-23T04:00:00 16 48 53.25 -13 24 22.5 -28.1 -7.5
2009-05-23T05:00:00 16 48 51.38 -13 24 15.1 -28.1 -7.5
2009-07-24T16:00:00 242.110458333 -11.6422222222 -10.8 -0.4
2009-07-24T17:00:00 242.107458333 -11.6423333333 -10.8 -0.4
NASA's Jet Propulsion Laboratory hosts HORIZONS, a database of solar system objects. If your target is included in this database, you should define a NASA JPL Horizons rather than a non-sidereal target.
Identifier. The identifier for your target in the HORIZONS database. Examples would be Pluto or Ubuntu.
Output interval. The time between the calculated ephemerides.
Tracking. Whether sidereal or non-sidereal tracking should be used for the observation.
Check daily position. This buttons allows you get a list of daily ephemerides. You should use this to double-check that the calculated ephemerides are indeed what you expect.
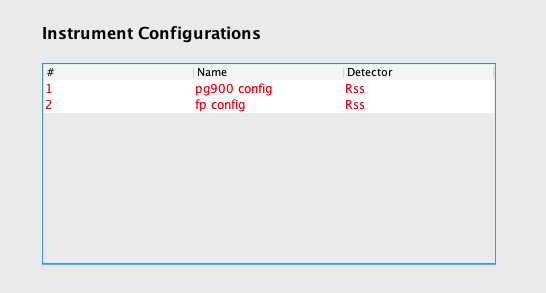
The Instrument Configurations form just contains a table, which you may use to add or remove instrument configurations.
When adding a new configuration, you have to choose the instrument to use (Salticam, RSS, HRS or BVIT). While the details you have to supply depend on the instrument, all the instruments require the following details.
Name. A unique name for the configuration. You may choose any name you like, but it is recommended to use a name which makes it easy to identify the configuration, in particular if your proposal contains lots of configurations.
Apart from HRS configurations all the configurations also let you add simulations.
Add Simulation. This button allows you to add simulations generated with the simulator for the chosen instrument.
The following table has the download links for the simulators as well as the file extensions of the simulation files.
| Simulator | Download | File extension |
|---|---|---|
| Salticam Simulator | Download | .ssim |
| RSS Simulator | Download | .rsim |
| HRS Simulator | Download | .hsim |
In order to create a simulation file, launch the relevant simulator, set up the simulation and then choose File > Save as... from the simulator's menu.
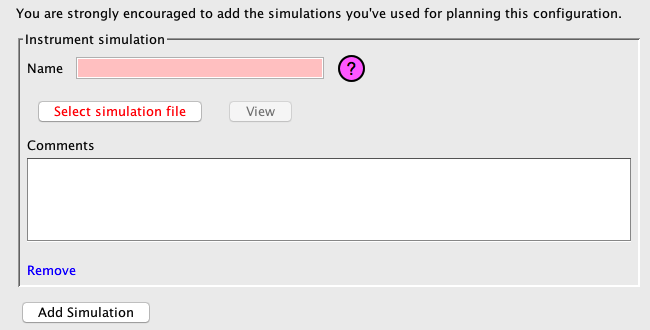
When adding a simulation, a few additional form components are shown, as described below.
Name. A name for your simulation. The name should be unique. You may refer to the simulation in your scientific justification by citing this name.
Select simulation file. This button lets you choose a simulation file from disk. Once you've chosen a file, its title changes to Replace simulation file, and it lets you replace the file.
View. This button opens the relevant simulator with your simulation.
Comments. If you have some brief comments regarding the simulation, you may add them here. An example might be:
The simulation is based on the measured flux over the H-alpha region from our pilot study, zero-redshift just for convenience. It is based on the lowest H-alpha flux regions to ensure that sufficient signal is gathered from all parts of the ring of interest. The simulation includes 2 visits with exactly the same setup.
Remove. This link removes the simulation from your proposal.
As mentioned above, different instruments require different additional details, which are outlined in the following.
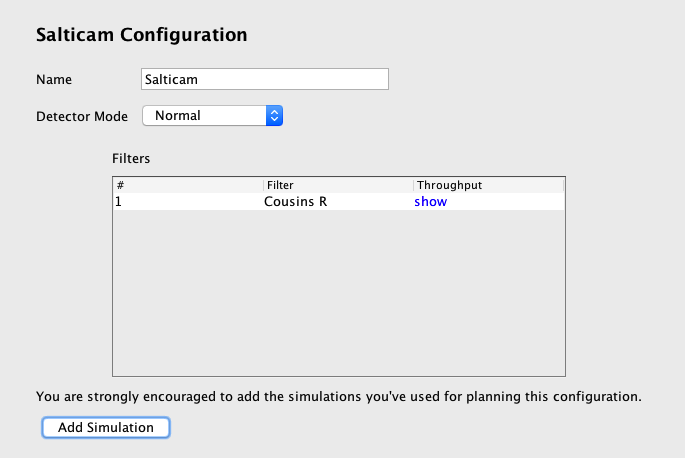
Detector mode. The detector mode to use for Salticam. Unless you have special requirements Normal should be the correct choice.
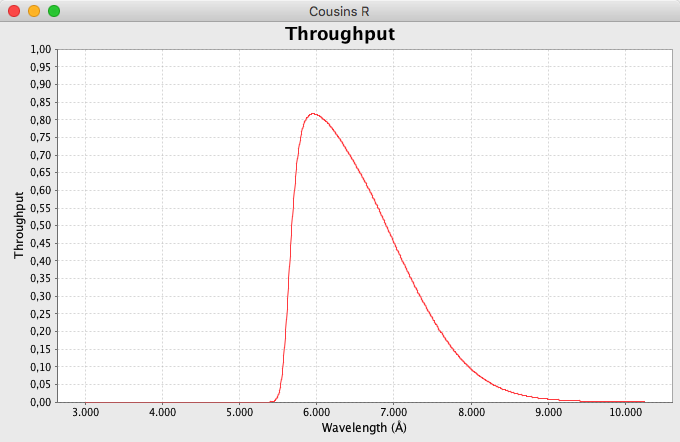
Filters. You should add all required filters to this table (which you may do by right-clicking on it). Each row in the table has a show link which opens a new window with the throughput curve of the selected filter.
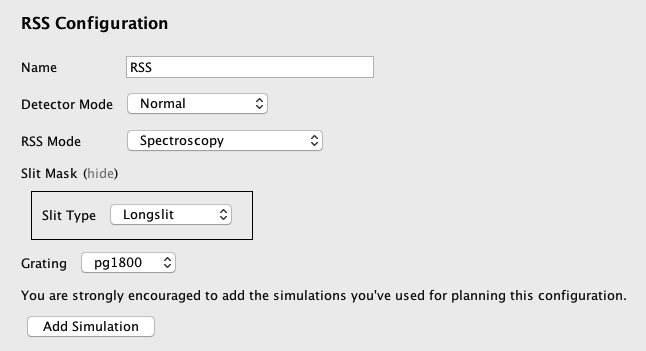
Detector mode. The detector mode to use for RSS. Unless you have special requirements Normal should be the correct choice.
RSS mode. The mode to use for RSS. Various choices require further details:
Slit mask. The kind of slit mask required for your observation. In case of a MOS mask, you need to supply a brief description of the mask. An example of such a description might be:
About 15 slits, 10" long, 1.0" wide.
Choose None if your configuration doesn't require a slit mask.
Mode. The mode to use for HRS.
Filter. The filter to use for BVIT.